What's inside
As an Amazon Associate I earn from qualifying purchases. This post may contain affiliate links at no extra cost to you.
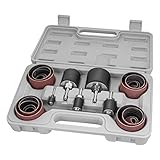
A good drill press drum sander is a sanding drum whose shank fits your chuck, whose diameter matches the curve, and whose sleeve can run safely at your press’s lowest suitable speed. For most woodworkers, a kit with several drums and replaceable sleeves is more useful than one oversized drum; choose a dedicated oscillating spindle sander instead if you expect frequent, long sanding sessions.
A drill press sanding attachment turns a standard drill press into a basic stationary sander for refining bandsawn curves, easing edges, and cleaning up small cutouts. It is not a substitute for a purpose-built spindle sander: the press’s spindle does not oscillate, so the abrasive contacts the same band of wood throughout the pass.
As an Amazon Associate we earn from qualifying purchases at no extra cost to you.


What we cover
Choose by curve, workload, and fit
- Mostly small, tight curves: Look for a kit with 1/2- and 3/4-inch drums. A smaller drum reaches tighter concave curves, though it removes material more slowly and can leave a more pronounced scallop if you tilt the work.
- Mixed curves and general shop use: A set with 1/2-, 3/4-, 1-, 1-1/2-, and 2-inch drums covers many furniture and craft profiles. Check that replacement sleeves are available in the matching diameters and lengths.
- Large, gentle curves: A 2- or 3-inch drum can smooth a broad radius faster and with less risk of digging in. It cannot enter a concave curve tighter than its radius without changing the shape.
- Occasional use on a small budget: A basic rubber expanding drum is often adequate if its arbor fits your chuck and sleeves are easy to replace. Expect more setup and cleanup than with a dedicated sander.
- Frequent production work: Consider an oscillating spindle sander. Its up-and-down motion spreads wear over more of the sleeve and reduces localized heat and grooves.
Drum sizes and sleeve details that matter
The diameter is a geometry choice, not simply a matter of sanding power. For a concave edge, the drum must be smaller than the curve’s inside radius to reach it cleanly. If the curve has a 3/4-inch radius, for example, a 1-inch-diameter drum (1/2-inch radius) can fit, while a 2-inch-diameter drum cannot. Leave some clearance for the workpiece to move smoothly.
Drum length determines how much edge you can sand without repositioning the work. A longer drum is useful for tall workpieces, but only if it clears the table and the press has enough spindle travel. Avoid exposing an unnecessarily long section of abrasive: unsupported sleeve can flex, wear unevenly, or catch an edge.
Most common kits use rubber drums that expand as a nut or screw is tightened, gripping a replaceable abrasive sleeve. Tighten enough to prevent the sleeve slipping, but do not overtighten; excessive pressure can distort the drum or make sleeve changes difficult. A rigid drum with a dedicated sleeve system may hold its shape well, but replacement abrasives can be less convenient or cost more.
| Drum diameter | Useful for | Typical sleeve grits | Main trade-off |
|---|---|---|---|
| 1/2 in. (12.7 mm) | Tight inside curves and small cutouts | 80, 120, 180 | Slow material removal; easier to create a wavy edge |
| 3/4 in. (19.1 mm) | Small furniture parts and craft curves | 80, 120, 180 | Limited reach in very tight corners |
| 1-1/2 in. (38.1 mm) | Medium curves and general smoothing | 80, 120, 180 | Too large for tighter concave profiles |
| 2 in. (50.8 mm) | Broad curves and longer edges | 80, 120, 180 | Needs a larger work area and compatible low speed |
These are common sizes and grits, not a guarantee that every kit includes them. Confirm sleeve diameter, length, and grit availability before buying. For typical curve cleanup, start with 80 or 120 grit depending on how rough the bandsaw cut is, then move to 150 or 180 for final smoothing. A drum sander for drill press use is for shaping and smoothing—not a reliable way to correct a badly cut profile or remove large amounts of stock.
Check arbor fit and speed before buying
Many small kits have a 1/4-inch shank; larger drums may use a 3/8-inch shank or another arbor size. Measure or check your drill press manual for chuck capacity, then confirm the attachment’s shank diameter and usable length. A press with a 1/2-inch chuck can usually hold a smaller shank, but that does not make every attachment suitable: the shank must seat securely, and the drum must clear the chuck, table, and workpiece.
Speed deserves equal attention. A drill press may offer speeds from a few hundred to several thousand RPM, but the lowest setting is not automatically safe for every drum. Follow the drum maker’s speed limit; if none is provided, ask the manufacturer rather than guessing. Larger drums have more abrasive surface moving past the wood per revolution, so they generally need more conservative speeds. Too much speed or pressure can burn wood, glaze the sleeve, loosen the abrasive, or make the work difficult to control.
For context, surface speed is approximately π × diameter × RPM. At 1,000 RPM, a 1-inch drum travels about 262 feet per minute at its circumference; a 2-inch drum travels about 524 feet per minute. This does not establish a safe operating speed, but it explains why duplicating the same RPM across different drum sizes can produce very different sanding behavior.
Comparison by setup type
| Setup | Best fit | Advantages | Limitations |
|---|---|---|---|
| Basic expanding-drum kit | Occasional curve sanding; varied small parts | Low initial cost; multiple diameters may be included | Non-oscillating; sleeve changes and alignment take attention |
| Single larger drum | Repeated work on broad, similar curves | Simple setup; useful contact area | Cannot reach tight profiles; one size limits versatility |
| Oscillating spindle sander | Regular sanding of many curves or longer sessions | Oscillation spreads wear and helps limit grooves | Costs more and requires dedicated bench or floor space |
A drill press spindle sander is often what people mean when they ask about a sanding drum mounted in a drill press, but the terms can be misleading: a regular drill-press drum does not oscillate. If you need the motion of a true oscillating spindle sander, use a machine designed for it rather than assuming a drill press attachment provides that feature.
Setup steps for a cleaner, safer edge
- Unplug the press. Install the drum and sleeve, then tighten the arbor in the chuck. Remove the chuck key before reconnecting power.
- Set the table and clearance. Keep the drum close to the table without allowing it to rub. Check that the whole workpiece can travel without striking the column or chuck.
- Choose a suitable speed. Use the attachment maker’s limit and the press’s speed settings. Start conservatively, particularly with a larger drum or a new sleeve.
- Support the workpiece. Keep it flat on the table and use a fence or sacrificial backing where helpful. Do not freehand a small piece near the drum; use a safe holding method that keeps fingers clear.
- Sand in light, moving passes. Keep the work moving to avoid grooves and heat buildup. Check the profile often instead of trying to remove all the waste in one pass.
- Inspect and clean up. Stop the press before adjustments. Brush dust from the sleeve and drum; replace a torn, glazed, or clogged sleeve rather than pressing harder.
Ownership costs and common wear points
Sleeves are the recurring cost. A kit may be inexpensive to buy, but a less common size can become frustrating if replacement sleeves are hard to find. Before choosing, check the price range for compatible sleeves and whether they are sold in the grits you use. In general, basic drum-and-sleeve kits cost less than a dedicated oscillating spindle sander, while more specialized arbor or sleeve systems can cost more; prices vary by size and included accessories.
Dust and heat shorten sleeve life. Resinous woods and fine dust can clog abrasive quickly, while excess pressure heats the work and wears one area of the sleeve. Let the abrasive do the cutting, clear dust from the work area, and replace sleeves when cleaning no longer restores their cut. Inspect rubber drums for cracks or distortion, and make sure the sleeve grips evenly before each use. A slipping sleeve is a reason to stop and reset—not to compensate by pushing harder.
For a versatile first drill press sander, choose a multi-size kit with a secure shank that matches your chuck, readily available sleeves, and a drum range suited to your smallest curve. Choose a larger single drum for repeated broad profiles, or a dedicated oscillating spindle sander when volume and finish consistency matter more than saving bench space.