What's inside
- Choose the bit by matching the jig, router, and joint—not by angle alone
- Compare the specifications that affect fit
- Pick by your setup
- Why angle and diameter cannot be treated separately
- How to use a dovetail router bit without sacrificing the stock
- When a box-joint bit is—and is not—the alternative
- Ownership details: keep the cutter accurate
- Before you buy
- Choose the bit by matching the jig, router, and joint—not by angle alone
- Compare the specifications that affect fit
- Pick by your setup
- Why angle and diameter cannot be treated separately
- How to use a dovetail router bit without sacrificing the stock
- When a box-joint bit is—and is not—the alternative
- Ownership details: keep the cutter accurate
- Before you buy
As an Amazon Associate I earn from qualifying purchases. This post may contain affiliate links at no extra cost to you.
What we cover
- Choose the bit by matching the jig, router, and joint—not by angle alone
- Compare the specifications that affect fit
- Pick by your setup
- Why angle and diameter cannot be treated separately
- How to use a dovetail router bit without sacrificing the stock
- When a box-joint bit is—and is not—the alternative
- Ownership details: keep the cutter accurate
- Before you buy
Choose the bit by matching the jig, router, and joint—not by angle alone
The right dovetail joint router bit is the one specified for your jig, fits your router’s collet, and cuts the joint dimensions your project needs. Start with the jig manual: it determines the permitted bit angle, cutting diameter, and often the cutting length. Then confirm the shank matches your router and that the bit can reach the required depth without its shank contacting the work or jig.
There is no universal “dovetail bit.” A bit that looks close may still produce loose or impossible-to-fit joints if its angle or diameter differs from the jig’s specification. For hand-laid-out dovetails, you have more freedom, but the same geometry still governs the fit.
As an Amazon Associate we earn from qualifying purchases at no extra cost to you.


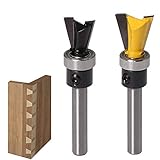

Compare the specifications that affect fit
| Bit specification | Common examples | What it means for the buyer |
|---|---|---|
| Included cutting angle | 7°, 8°, 9°, 14° | Must match the jig or the mating tails and pins will not fit correctly. These are representative options, not interchangeable standards. |
| Cutting diameter | 1/2 in., 5/8 in., 3/4 in. | Affects the width and geometry of the cut. Use the jig’s specified diameter; changing it can alter the joint even if the angle matches. |
| Shank diameter | 1/4 in. or 1/2 in. | Must match the router collet. A 1/2-in. shank cannot go in a 1/4-in. collet, and a reducer sleeve is not a substitute for a properly sized collet. |
| Cutting length | Often around 1/2–3/4 in. | Must cover the stock thickness and required jig setup while leaving safe clearance. Check the manufacturer’s drawing, not just the overall bit length. |
| Overall length | Varies by model | Determines clearance in the router and jig. A longer bit is not automatically better; excessive projection increases leverage and can make setup less stable. |
Dimensions above are common examples to help compare specifications, not a recommendation for a particular jig. Manufacturers may describe the angle using different conventions, so compare the exact specification and drawing rather than relying on a number found in isolation.
Pick by your setup
- Using a commercial dovetail jig: Buy the exact bit type and dimensions named in the jig instructions. The router bit for a dovetail jig is a matched component; even a small diameter difference can change joint fit or spacing.
- Using a router table for a guided joint: Check whether the jig is designed for a router table and whether it specifies a particular bit. A dovetail joint router table setup still needs a suitable fence or jig, secure workholding, and adequate cutter clearance; the table itself does not make an incompatible bit fit.
- Cutting occasional joints in a compact router: A 1/4-in.-shank bit may suit a router with a 1/4-in. collet, provided the jig allows that bit specification. Do not choose it solely because the shank fits: check the cutter’s permitted diameter, cutting length, and speed rating.
- Cutting frequently or through hardwood: Consider a quality carbide-tipped bit in the correct shank size. A 1/2-in. shank can offer greater rigidity when the router and jig accept it, but it cannot compensate for a dull edge, poor setup, or an unsuitable cutter.
- Making hand-laid or custom dovetails: Choose the angle and dimensions around your layout and matching parts. Make a test joint from offcuts before cutting project pieces; a jig-specific bit may not suit a custom layout.
Why angle and diameter cannot be treated separately
The angle determines how steep the dovetail sides are. A shallower angle makes a broader, less pronounced flare; a steeper angle makes a more pronounced flare. The diameter helps determine the cutter’s reach and the resulting joint geometry. Together with cutter depth and jig spacing, these dimensions control whether the tails and pins mate.
For a jig, the practical rule is simple: do not “correct” a fit problem by swapping to a similar-looking angle or diameter. First check that the bit is the specified model or specification, that it is seated correctly, and that the jig and depth stops are set as instructed. If the bit is right but the joint is loose, adjust only the jig’s fit control, if it has one, and verify the change with test cuts.
How to use a dovetail router bit without sacrificing the stock
- Check compatibility. Confirm the bit’s angle, diameter, cutting length, shank, and speed limit against the router and jig manuals. Inspect the cutter for chipped carbide, resin buildup, or a bent shank.
- Install and set depth. Unplug the router before changing bits. Seat the shank securely in the collet following the router maker’s instructions, then set cutter depth and any guide or bearing position specified by the jig.
- Prepare and clamp test pieces. Use matching offcuts of the same thickness and similar material as the project. Keep the work firmly registered against the jig; movement can spoil the joint and create a safety hazard.
- Make the prescribed cuts. Follow the jig’s cutting order and feed direction. Take controlled passes rather than forcing the router, especially in dense hardwood. Keep hands clear of the cutter and wait for it to stop before adjusting the setup.
- Test the fit and adjust one variable at a time. A joint should assemble with firm, even pressure—not hammering and not a loose slide. If the jig offers a fit adjustment, make a small change and cut another test joint. Avoid changing bit depth or cutter specifications unless the instructions call for it.
- Cut the project parts only after the test fits. Label the mating pieces and preserve their orientation. A correct test joint is the best check that the bit, jig, stock thickness, and setup are working together.
When a box-joint bit is—and is not—the alternative
A box joint uses straight-sided, alternating fingers rather than tapered dovetail tails and pins. A box joint router bit, sometimes called a router bit box joint cutter, cuts that different profile; it is not a substitute for a dovetail bit, and a dovetail cutter cannot produce a standard box joint. Box joints can be a practical choice when you want visible square fingers and have the matching jig or indexing setup. Choose based on the joint design, not on which bit happens to be available.
Ownership details: keep the cutter accurate
Carbide edges can chip if a bit is dropped or struck against metal, and pitch or resin buildup can make a sharp cutter perform poorly. Clean the bit with a cleaner approved for router cutters, using a soft brush rather than scraping the cutting edges. Store it so the carbide cannot knock against other tools. Replace or professionally resharpen a damaged or dull cutter; sharpening changes cutter dimensions, which can matter with a precision jig.
Do not exceed the bit’s stated maximum speed, and use the lowest speed required by the bit and router guidance when a large cutter calls for it. Unusual vibration, burning, or a ragged cut is a reason to stop and inspect the bit, collet, workholding, and feed—not to push harder. For a buyer, the most economical bit is usually the correctly specified one that stays clean and is used within its limits, rather than a near-match that produces repeated failed joints.
Before you buy
- Write down the jig’s required angle, cutting diameter, and cutting length.
- Match the shank to the router’s actual collet; confirm the router can run the bit within its rated limits.
- Check that the cutter clears the jig and stock at the intended depth.
- Prefer clear manufacturer specifications and a sound carbide edge over a low price on an unspecified bit.
- Plan to make test cuts in scrap before routing finished parts.
If you do not own a jig yet, choose the jig first and buy its specified cutter afterward. That keeps the bit, guide, and joint dimensions compatible from the start.