What's inside
As an Amazon Associate I earn from qualifying purchases. This post may contain affiliate links at no extra cost to you.
What we cover
Best Low-Profile Welding Masks for Tight Spaces
For tight spaces, the best low profile welding mask is the shallowest helmet that still gives you a clear view of the joint, enough headgear clearance to hold a stable position, and the right protection for your process. For occasional repairs and mixed-position work, a compact auto-darkening helmet is usually the most versatile choice; for frequent overhead or cramped work, prioritize a slim shell and a headgear system that does not force your head away from the work.
“Low profile” is not a standardized measurement. A compact-looking shell can still bump into a pipe or wall because its rear adjustment knob, crown strap, or lens housing sticks out. Compare actual front-to-back depth where available, then consider how the helmet sits on your head and whether you can raise and lower it without catching surrounding equipment.
As an Amazon Associate we earn from qualifying purchases at no extra cost to you.
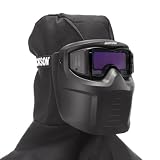


What matters most in a confined work area
- Mask depth: A shorter front-to-back profile helps when your face is close to a wall, pipe, or frame. Check the shell and the rear headgear adjustment together; either can be the part that hits first.
- Viewing area: A larger window can make it easier to see the joint and torch position, but it may require a larger lens housing. In a very restricted space, a smaller window can be a practical trade-off if the weld remains visible at your working angle.
- Headgear clearance: Look for a headband and adjustment wheel that can be tightened without protruding far behind your head. Test whether the helmet stays in place when you look down, turn, or work overhead.
- Protection and fit: The shell, lens, and cover plates must be intact and suitable for the work. Confirm the manufacturer’s specifications for the processes you use, including the lens’s required shade range. A compact helmet is not a substitute for appropriate welding protection.
Compact helmet options compared
The table compares established helmet designs and representative specifications. Models and configurations can change, so verify the exact current product data before buying. Shell depth is not consistently published, which is why it is marked “not specified” rather than estimated. Viewing-area figures are lens-window dimensions, not the helmet’s overall size.
| Helmet | Viewing area | Lens type | Useful fit consideration | Best suited to |
|---|---|---|---|---|
| 3M Speedglas Welding Helmet 100 | 1.73 × 3.66 in (44 × 93 mm) | Auto-darkening; shade 8–12 | Compact viewing window; check shell and headgear clearance in your work position | General welding and buyers wanting a straightforward compact-format option |
| Lincoln Electric VIKING 1740 | 3.74 × 3.34 in (95 × 85 mm) | Auto-darkening; shade 9–13 | Wider, taller viewing area than the Speedglas 100; confirm the larger lens housing fits | Welders who value a broad view and need a versatile everyday helmet |
| ESAB Sentinel A50 | 3.93 × 2.36 in (100 × 60 mm) | Auto-darkening; shade 5–13 | Distinctive shell and headgear shape; check rear clearance as well as front depth | Frequent users who want a large screen and adjustable settings |
| Jackson Safety BH3 | 3.8 × 2.7 in (97 × 69 mm) | Auto-darkening; shade 9–13 | Compare the complete helmet profile with the space behind your head | Welders who want a roomy view without choosing solely by shell size |
These figures help compare viewing windows, but they do not establish which helmet is physically shallowest. Manufacturers do not provide depth in a consistent, directly comparable format for every model. If depth is critical, ask for the overall front-to-back measurement of the exact configuration, including the headgear adjustment, and compare it with your available clearance.
Choose by the job, not just by the shell
| Your situation | What to prioritize | Practical choice |
|---|---|---|
| Infrequent home repairs; limited budget | Reliable fit, adequate shade range, replaceable cover plates | A basic auto-darkening helmet with a compact shell; avoid paying extra for features you will not use |
| Beginners learning several processes | Clear view, simple controls, suitable shade range, comfortable adjustment | A mid-range auto-darkening helmet with documented settings for your processes |
| Regular work between pipes or inside frames | Measured depth, low-profile rear adjustment, stable headgear | Try a compact-format model in your actual working posture before committing |
| Frequent overhead or awkward-position welding | Secure fit, dependable coverage, accessible sensitivity and delay controls | Choose the helmet that stays put when tilted and does not collide with the surrounding structure |
| Extremely little clearance behind the head | Rear knob and headband projection, not just lens size | Consider a low-profile passive hood or a different headgear configuration if compatible and approved by the manufacturer |
A low profile welding hood can be a sensible alternative when the work area is too tight for a bulky auto-darkening assembly. Passive hoods have no electronic lens pack or battery to manage, but you must raise or lower the hood to see between welds. That movement can be inconvenient when both hands are occupied or positioning is delicate. Make sure the hood and filter are designed for welding and provide the required protection; do not improvise with an unmarked lens.
Check fit before the first arc
- Measure the pinch point. Note the clearance from your face to the obstacle and from the back of your head to anything behind you. Include room for the helmet to tilt.
- Wear your usual PPE. Try the helmet with the cap, respirator, or other compatible equipment you normally use. These can change how the headgear sits. Follow the helmet and PPE manufacturers’ compatibility guidance.
- Move through the work posture. With the helmet down, look toward the joint, tilt your head, and turn as far as the task requires. Check for contact, slipping, or blocked sightlines before welding.
- Set the lens for the process. Use the manufacturer’s guidance for shade, sensitivity, and delay. A larger viewing area does not compensate for incorrect settings or a damaged lens.
- Confirm coverage. Check that the helmet protects your face and eyes in the planned position, and wear the other required protective equipment for the job. Inspect the setup before striking an arc.
Ownership: what wears out first
On a frequently used helmet, the outer cover plate is often the first consumable to become scratched, spattered, or cloudy. Replace it with the correct part when visibility suffers; a damaged cover plate can make an otherwise good lens difficult to use. Inside cover plates, headgear adjustment parts, and batteries—where the model uses replaceable batteries—also need periodic attention.
Clean the shell and lens area using the manufacturer’s instructions. Avoid abrasive pads, unapproved solvents, and wiping grit across the viewing window: small scratches can scatter light and reduce clarity. Keep spare cover plates on hand if you weld regularly, and inspect the shell, lens, and headgear before work. Cracks, loose parts, failed auto-darkening behavior, or persistent lens problems are reasons to stop using the helmet until it is repaired or replaced.
For a final decision, rank your constraints in this order: required protection, fit and stability, actual clearance, then viewing area and extra features. That prevents a common mistake—choosing the smallest-looking low profile welding helmet, only to find that its rear knob collides with the work or its viewing window makes the joint hard to track.