What's inside
- Quick picks by photographer and situation
- What extension tubes actually change
- Mount compatibility comes first
- Electronic contacts versus manual tubes
- Head-to-head: short, medium, and long tubes
- Light loss: the calculation many listings omit
- Working distance and lens choice
- How to choose the right set
- Ownership, cleaning, and common mistakes
- Bottom line
- Quick picks by photographer and situation
- What extension tubes actually change
- Mount compatibility comes first
- Electronic contacts versus manual tubes
- Head-to-head: short, medium, and long tubes
- Light loss: the calculation many listings omit
- Working distance and lens choice
- How to choose the right set
- Ownership, cleaning, and common mistakes
- Bottom line
As an Amazon Associate I earn from qualifying purchases. This post may contain affiliate links at no extra cost to you.
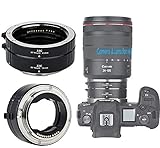
The best extension tubes for macro photography are the ones made for your exact camera mount, with electronic contacts if you need autofocus, aperture control, or EXIF data; for most photographers, a well-built 11–18mm or 12–20mm contact-equipped set is the most useful starting point.
As an Amazon Associate we earn from qualifying purchases at no extra cost to you.

What we cover
- Quick picks by photographer and situation
- What extension tubes actually change
- Mount compatibility comes first
- Electronic contacts versus manual tubes
- Head-to-head: short, medium, and long tubes
- Light loss: the calculation many listings omit
- Working distance and lens choice
- How to choose the right set
- Ownership, cleaning, and common mistakes
- Bottom line
Quick picks by photographer and situation
| Situation | Best choice | Why | Typical price range in 2026 |
|---|---|---|---|
| Occasional close-ups on a budget | Manual 10–16mm set in your native mount | Low cost and useful magnification without complicated electronics | $20–$45 |
| Regular still-life, flower, or product work | Electronic-contact 11–18mm or 12–20mm set | Preserves aperture control and usually retains autofocus | $60–$140 |
| Maximum flexibility with a DSLR macro lens | Kenko DG set with 12mm, 20mm, and 36mm tubes | Three lengths provide more combinations than a single tube | $120–$220 |
| High-magnification experiments | Manual 20–36mm tube, preferably metal-mounted | Longer extension produces more magnification but demands careful focusing | $35–$100 |
| Fast-moving subjects or frequent lens changes | Native-mount electronic set with a positive locking mount | Maintains camera communication and reduces handling friction | $80–$220 |
What extension tubes actually change
An extension tube is a hollow spacer placed between the camera and lens. It contains no glass. Moving the lens farther from the sensor reduces its minimum focusing distance and increases magnification, allowing an ordinary lens to focus much closer than it normally can.
For a simple lens focused near infinity, a useful approximation is:
Added magnification ≈ extension length ÷ focal length.
For example, a 20mm tube behind a 50mm lens provides approximately 0.4× additional magnification at the close-focus end of the lens’s range. A 36mm tube with the same lens provides approximately 0.72×. The real result varies because modern lenses use internal focusing and may change focal length as they focus.
Extension is not the same as a close-up filter or teleconverter. It does not add optical glass, so it normally avoids introducing another lens element. However, it cannot focus at infinity while installed, and the usable focusing range becomes much narrower.
Mount compatibility comes first
Choose a tube designed for the camera-side mount and the lens-side mount. A Canon RF tube belongs on Canon RF equipment; a Canon EF tube belongs on Canon EF equipment. Mount diameter and flange distance are not interchangeable simply because two systems come from the same manufacturer.
- Canon EF: Canon EF 12 II and EF 25 II are established manual extension tubes. Third-party electronic sets are also available.
- Canon RF: Check specifically for RF compatibility rather than assuming an EF tube will work. An EF tube can sometimes be used in an EF lens and RF body combination only when the appropriate EF-to-RF adapter is part of the setup.
- Nikon F: Older Nikon lenses and bodies have several mechanical and electronic variations. A tube that fits physically may not meter or control aperture with every lens.
- Nikon Z: Use a Z-mount tube for native Z lenses, and verify contact compatibility with the particular lens. F-mount tubes require an FTZ-series adapter and an appropriate F-mount lens.
- Sony E: Electronic E-mount tubes are generally the practical choice for modern autofocus lenses. Manual tubes are inexpensive but require a lens with a usable manual aperture control.
- Fujifilm X, Micro Four Thirds, and other mirrorless mounts: Native electronic and manual options exist, but the exact contact layout and firmware behavior differ by brand and lens.
Adapters add another layer of uncertainty. Before buying, confirm the complete chain: camera mount, adapter if any, tube mount, lens mount, and whether the lens has an aperture ring or requires electronic control.
Electronic contacts versus manual tubes
Contact-equipped tubes pass electrical signals between camera and lens. Depending on the design and equipment, they may preserve autofocus, aperture adjustment, image stabilization, lens identification, and flash communication. They do not make every lens perform as if no tube were installed, but they are much easier to use with modern lenses.
Manual tubes contain no contacts. They are mechanically simple and often lighter, cheaper, and less prone to electronic failure. They work best with lenses that have a physical aperture ring, such as many older manual-focus lenses. With some DSLR lenses, the aperture remains wide open because the camera has no way to command the lens to stop down. That can make focusing difficult and may prevent practical exposure control.
For macro work, autofocus is less important than many buyers expect. At high magnification, photographers often move the camera forward and backward to find focus. Electronic aperture control, however, remains valuable because it lets you stop down the lens for more depth of field. If choosing between a cheaply made contact tube and a solid manual tube for a lens with a physical aperture ring, the manual tube may be the more reliable purchase.
Head-to-head: short, medium, and long tubes
| Tube length | Example with 50mm lens | Working-distance effect | Best use |
|---|---|---|---|
| 10–12mm | About 0.20–0.24× added magnification | Moderate reduction; easier to light and compose | Flowers, food, larger objects, first experiment |
| 16–20mm | About 0.32–0.40× added magnification | Noticeable reduction; closer framing with manageable clearance | Product details, coins, textures, small plants |
| 25mm | About 0.50× added magnification | Shorter clearance and more demanding lighting | Small objects and near-macro experiments |
| 36mm | About 0.72× added magnification | Very close working range with a standard lens | High magnification, controlled subjects, manual focusing |
These figures are estimates, not guaranteed magnification ratings. A 50mm lens designed for close focusing may produce a different result from a 50mm lens focused at infinity. Wide-angle lenses become especially difficult with long tubes because the front element may need to be extremely close to the subject.
Light loss: the calculation many listings omit
Extension does not absorb light like a filter, but it reduces the effective aperture because the lens is being used farther from its sensor position. A useful approximation is:
Effective f-number = marked f-number × (1 + extension ÷ focal length).
Suppose you use a 50mm lens at f/8 with a 25mm tube:
f/8 × (1 + 25 ÷ 50) = f/8 × 1.5 = approximately f/12.
The camera may display f/8 because that is the lens’s selected setting, while the effective exposure is closer to f/12. The corresponding light loss is approximately 1.17 stops. A 36mm tube on the same lens gives f/13.8 effective aperture, or roughly 1.6 stops of loss.
Modern cameras usually meter through the lens and compensate automatically when electronic communication works. Manual tubes require you to compensate with shutter speed, ISO, flash power, or a wider physical aperture.
Working distance and lens choice
Extension increases magnification, but it does not preserve the working distance of a dedicated macro lens. A 100mm macro lens with a 20mm tube generally gives more clearance than a 35mm lens with the same tube. That matters for insects, reflective products, and any subject that is easily shadowed by the lens.
A longer lens also makes it easier to position a flash or LED light beside the subject. Conversely, a short lens and long tube can place the front element only a few centimeters away, making lighting awkward and potentially disturbing living subjects.
How to choose the right set
1. Match the tube to the lens you use most
For a 35mm lens, start with 10–12mm. For a 50mm lens, 12–20mm is more versatile. For an 85mm or 100mm lens, 20–36mm can provide useful additional magnification without immediately making the setup unmanageable.
2. Decide whether you need contacts
Choose electronic contacts if your lens lacks an aperture ring, if you rely on in-camera metering, or if you want lens stabilization and EXIF data. Choose manual tubes when low cost, mechanical simplicity, and compatibility with vintage lenses matter more.
3. Prefer separate lengths over one very long tube
A set containing 11mm and 18mm tubes gives three combinations: 11mm, 18mm, and 29mm. That is more useful than a single 29mm tube because the shorter options preserve more working distance and make composition easier.
4. Inspect the mechanical construction
Look for a metal bayonet, a firm lens release, a flat mating surface, and minimal rotational play. The tube should not wobble when a heavy lens is mounted. Plastic bodies can work well for light lenses, but metal mounts are preferable for repeated use or long lenses.
Ownership, cleaning, and common mistakes
The first parts likely to wear are the bayonet surfaces, release button, and electronic contact springs. Avoid carrying a camera by a long lens attached through several tubes. Support the lens with one hand, especially when using a tripod collar or a heavy zoom.
- Keep both caps on the tube when it is not installed; dust inside the hollow tube can reach the sensor during changes.
- Clean contacts with a dry, lint-free cloth rather than liquid solvent.
- Do not force a lens that stops before the locking position; mismatched mounts can damage the bayonet.
- Begin with the lens focused near infinity, install the tube, then move the camera to find the focusing range.
- Use a small aperture only when necessary. At high magnification, diffraction can remove detail even though depth of field remains very shallow.
- Use a rail or tripod for static subjects; tiny camera movements produce large framing changes at macro distances.
Bottom line
For most buyers, the best extension tubes for macro photography are a native-mount electronic set in the 11–20mm range. It offers meaningful close-focusing ability while retaining aperture control and avoiding the extreme working-distance loss of a long tube. Choose a three-piece set such as the 12mm, 20mm, and 36mm Kenko DG configuration when you want broad control, a manual metal set for vintage lenses and experimentation, and the shortest compatible tube when lighting space and subject distance matter most.