What's inside
As an Amazon Associate I earn from qualifying purchases. This post may contain affiliate links at no extra cost to you.
Drill press safety comes down to four habits: wear eye protection and no gloves, loose sleeves or jewelry near the spindle; clamp or fence every workpiece so it cannot spin; match spindle speed to bit size and material; and remove the chuck key before switching on. Most drill press injuries happen when a part grabs the bit and whips around, or when hair, cuffs or gloves wrap around the rotating chuck, and both are preventable with setup rather than reflexes.
As an Amazon Associate we earn from qualifying purchases at no extra cost to you.


What we cover
PPE: What to Wear and What to Avoid
| Item | Requirement | Why |
|---|---|---|
| Safety glasses | ANSI Z87.1-marked, side protection | Chips and broken bits fly radially from the spindle |
| Face shield | Over glasses for wire wheels, hole saws in metal, fly cutters | Larger fragments and wire bristles |
| Hearing protection | Earplugs or muffs, NRR roughly 20-30 dB for long sessions | Large hole saws and metal drilling can be loud over time |
| Dust mask or respirator | N95-class for fine wood dust or MDF | Fine dust from sanding drums and MDF |
| Gloves | Do not wear while the spindle turns | Gloves catch on bits and pull the hand in |
| Clothing | Short or tight-cuffed sleeves, no ties, no lanyards | Entanglement |
| Hair and jewelry | Long hair tied back, rings and bracelets off | Entanglement |
| Footwear | Closed-toe, ideally safety-toe | Dropped vises and workpieces |
Before You Switch On: Setup Checklist
- Machine stability: a benchtop press should be bolted to the bench; a floor press should sit level and, if tall and top-heavy, be anchored to the floor.
- Chuck key out: make it a habit to remove it immediately after tightening. A self-ejecting spring-loaded key prevents the classic thrown-key injury.
- Bit seated and centered: tighten the chuck in at least two of its key holes and spin by hand to check for wobble.
- Table height and depth stop: set the depth stop so the bit cannot reach the table or vise; use a sacrificial backer board under through-holes.
- Belt guard closed after any speed change.
- Clear the table of offcuts, tools and loose clamps.
- Light and visibility: make sure you can see the mark and the bit tip without leaning in.
Clamping and Workholding by Workpiece
Bits want to grab and spin the workpiece counterclockwise (viewed from above). Every setup needs something that resists that rotation, not just your hand.
| Workpiece | Hold it with | Key detail |
|---|---|---|
| Flat board, holes under ~1/2 in | Fence plus one clamp | Put the fence on the left so rotation pushes the work into it |
| Board, Forstner or hole saw over 1 in | Fence plus two clamps | Slow speed; large bits grab hard on breakthrough |
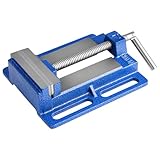
| Small parts under ~4 in | Drill press vise or handscrew clamp | Never hold small parts by hand |
| Round stock, dowels, pipe | V-block clamped to table | Center punch metal first |
| Sheet metal | Clamp to a wood backer | Thin metal climbs the bit and becomes a spinning blade |
| Long boards | Outfeed or roller support | Tipping weight pulls the work off the fence |
| Angled holes | Tilted table or angled jig plus clamps | Re-check depth stop after tilting |
Speed Chart: Matching RPM to Bit and Material
Excess speed with large bits causes burning, chatter and grabbing; too little speed with small bits causes breakage from feed pressure. These are common starting points for high-speed steel and typical woodworking bits.
| Bit type and size | Softwood | Hardwood | Mild steel | Aluminum |
|---|---|---|---|---|
| Twist bit 1/8 in | ~3,000 rpm | ~3,000 rpm | ~2,500 rpm | ~3,000 rpm |
| Twist bit 1/4 in | ~2,500 rpm | ~2,000 rpm | ~1,200 rpm | ~2,500 rpm |
| Twist bit 1/2 in | ~1,500 rpm | ~1,000 rpm | ~600 rpm | ~1,200 rpm |
| Forstner 1 in | ~1,000 rpm | ~700 rpm | – | – |
| Forstner 2 in | ~500 rpm | ~350 rpm | – | – |
| Hole saw 2-1/2 in | ~400 rpm | ~300 rpm | ~150-250 rpm | ~300 rpm |
| Fly or circle cutter | ~300-500 rpm | ~250-400 rpm | Not recommended | – |
Use cutting fluid on steel, peck-drill deep holes (lift every 1/4-1/2 in of depth to clear chips), and ease off pressure as the bit breaks through, which is when it grabs hardest.
Common Hazards and How to Prevent Them
Spinning workpiece
The most frequent serious injury. Prevention: fence on the correct side, clamps on anything small or any bit over about 1/2 inch, and a light feed at breakthrough.
Entanglement
Gloves, sleeves and hair wrap around the chuck in a fraction of a second. Prevention: dress for the machine, and never reach behind or around a turning bit to clear chips. Stop the spindle and use a brush.
Thrown chuck key or broken bit
Prevention: self-ejecting key, dull or bent bits replaced, and no side loading. A drill press is not a milling machine; side pressure snaps bits and can loosen the chuck taper.
Fly cutters
The cutter arm is nearly invisible when spinning. Prevention: lowest speed, workpiece clamped at both ends, hands well clear, and a face shield.
Recommended Safety Gear and Accessories
| Gear | What to look for | Typical 2026 cost |
|---|---|---|
| Safety glasses | Z87.1+, anti-fog, wraparound | $8-$25 |
| Face shield | Polycarbonate, Z87.1 marked | $15-$40 |
| Earmuffs | NRR 25 dB or higher, slim cups | $15-$40 |
| Drill press vise | 3-4 in jaws, slots for table bolts | $25-$80 |
| Hold-down clamps | Fit table T-slots or fence track | $20-$60 per pair |
| Auxiliary table with fence | Large flat surface, replaceable insert | $60-$200 or shop-made |
| Self-ejecting chuck key | Correct size for your chuck | $8-$20 |
| Chip brush | Stiff bristles, long handle | $3-$10 |
Maintenance That Keeps the Press Safe
- Check belt tension and condition every few months; a slipping belt invites forcing the feed.
- Inspect the chuck jaws for burrs and clean the arbor taper so the chuck stays seated.
- Test the quill return spring; a weak spring lets the quill drift down.
- Keep the table surface waxed and free of rust so workpieces slide predictably against the fence.
- Make sure the emergency or power switch is easy to reach without leaning over the spindle; a paddle-style switch is a worthwhile upgrade.
Quick Pre-Use Routine
Glasses on, gloves off, sleeves secured. Bit tight, key out, speed matched. Work clamped or fenced, depth stop set, backer board in place. Then start the machine, let it reach speed, and feed steadily. Following that sequence every time removes most of the risk a drill press presents.