What's inside
As an Amazon Associate I earn from qualifying purchases. This post may contain affiliate links at no extra cost to you.
What we cover
Which Tool Should You Use?
For installing cabinet screws, a regular drill driver is usually the better tool. It gives you smoother control, makes it easier to stop at the correct depth, and is less likely to damage a cabinet face frame or strip a screw head. An impact driver is faster and more powerful, but that extra force is useful mainly for long screws, dense hardwood, and repetitive work.
For most cabinet installation and hardware jobs, buy a 12V cordless drill driver or a compact 18V drill driver. Choose an impact driver when you regularly drive 2-1/2-inch or longer structural screws, work with hardwood, or want one tool for both cabinet work and heavy fastening.
As an Amazon Associate we earn from qualifying purchases at no extra cost to you.


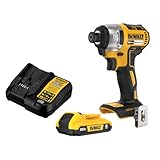

How Drill Drivers and Impact Drivers Differ
A drill driver applies steady rotary force through a clutch. The clutch slips when the tool reaches a selected torque level, helping prevent overdriving. You can also control speed with the trigger, which is useful when starting a screw or working close to a finished surface.
An impact driver has a hex chuck and an internal hammer-and-anvil mechanism. When resistance rises, the tool delivers rapid twisting impacts. This lets it drive stubborn screws with less twisting force transferred to your wrist, but the impacts make it harder to feel exactly when the screw is seated.
| Feature | Drill driver | Impact driver |
|---|---|---|
| Control near finished surfaces | Excellent | Fair |
| Best screw length for cabinet work | 1 to 2-1/2 inches | 2 to 3-1/2 inches |
| Chuck type | Keyless 3-jaw chuck | 1/4-inch hex quick-change chuck |
| Risk of stripping or overdriving | Lower with the clutch set correctly | Higher if used at full speed |
| Useful for drilling | General-purpose bits and hole saws | Hex-shank bits only; less suitable for large holes |
When a Drill Driver Is the Better Choice
Use a drill driver for attaching cabinets to studs, joining face frames, installing hinges, mounting drawer slides, and fastening trim. These jobs reward control more than maximum torque. A clutch setting around 5 to 10 is a reasonable starting point for small cabinet screws, though settings vary widely between tools. Test on scrap material and raise the setting only as needed.
A drill driver also makes pilot holes easier. For a typical #8 cabinet screw, use a bit close to the screw’s solid-body diameter when drilling into hardwood. A 1/8-inch bit is often suitable for many #8 screws in softwood, while hardwood may need a 9/64-inch or 5/32-inch pilot depending on the screw and material. The threaded portion should bite; the smooth shank should pass freely through the cabinet rail or stile.
The main failure mode is overdriving. If the screw head sinks below the surface, it can crush veneer, split a narrow face frame, or pull a cabinet out of alignment. A drill’s clutch reduces this risk. Start slowly, keep the bit square to the screw, and stop when the head is flush or when the washer contacts the cabinet hardware.
When an Impact Driver Is Worthwhile
An impact driver earns its place when you are fastening through thick cabinet rails into studs with long screws. Driving a 3-inch screw through a predrilled rail can become slow with a small drill, especially in dense maple, oak, or a hardwood stud. An impact driver handles this work quickly and is less likely to stall.
It is also useful when building or installing many cabinets. The reduced reaction torque can make repetitive fastening less tiring, and the tool’s short body fits into corners. However, the compact size does not make it automatically safer. A 2,000-in-lb impact driver can drive a cabinet screw far beyond what particleboard or a thin face frame can tolerate.
Use the lowest speed or power mode available, pull the trigger gently, and release it before the screw bottoms out. If the driver has three electronic modes, its lowest setting is usually the most appropriate starting point. For delicate work, a drill driver remains easier to control.
Bits and Screw Selection Matter
Many stripped screws are caused by a poor bit rather than an inadequate tool. Use a fresh, correctly sized Phillips, square-drive, or star bit that fully fills the recess. A worn Phillips bit will cam out quickly, particularly under impact. For an impact driver, choose impact-rated 1/4-inch hex driver bits. Standard bits can break or wear prematurely under repeated impacts.
For cabinet installation, construction screws or cabinet screws with a suitable head are preferable to drywall screws. Drywall screws are brittle and have poor holding power in some cabinet materials. In particleboard or melamine, use screws designed for engineered wood and avoid driving too close to an edge. Keep at least 1/2 inch from an edge when practical, and drill a pilot hole to reduce splitting and bulging.
When fastening a cabinet to a stud, confirm the stud location and use a screw long enough to enter the stud by roughly 1 to 1-1/2 inches after passing through the cabinet rail, shims, and drywall. Do not rely on a screw that only bites drywall. For a cabinet side or back where no stud is available, use an appropriate wall anchor rather than simply increasing screw length.
A Reliable Cabinet-Screw Workflow
First, clamp or shim the cabinet in its final position. Check level, plumb, and alignment before drilling. Mark the screw locations so they land in solid material rather than a hinge cup, shelf-pin hole, or cabinet joint.
Next, drill a clearance hole through the cabinet rail if the screw must pull the cabinet tight to a stud. Follow with a pilot hole into the stud. This prevents the screw threads from binding in the cabinet and leaving a gap between the cabinet and wall.
Drive the screw at low speed until the head is seated. With a drill driver, use the clutch and finish with a short burst at low speed. With an impact driver, use light trigger pressure and stop early. If the cabinet shifts while tightening, back the screw out, correct the alignment, and drive it again rather than forcing it.
The Practical Buying Decision
If you are buying one tool for occasional cabinet installation, choose a drill driver. A compact 18V brushless drill driver kit provides enough power for cabinet screws, pilot holes, and general household drilling. The cheaper brushed version is fine for infrequent projects if it has a usable clutch and a comfortable trigger.
Choose an impact driver as a second tool if you already own a drill, or if your work includes long structural screws and heavy framing. A kit with both tools is convenient: use the drill for drilling and controlled fastening, and the impact driver for long screws. For a single kitchen, though, an impact driver is not required. Careful technique and a sharp bit matter more than peak torque.