What's inside
As an Amazon Associate I earn from qualifying purchases. This post may contain affiliate links at no extra cost to you.
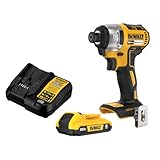
Cabinet screws are small enough to drive quickly and large enough to split a face frame or bury their heads in an instant. An impact driver can make installation faster, but the best choice is one with controllable speed and a comfortable grip—not simply the highest torque rating. For occasional cabinet work, a basic 18V or 20V cordless impact driver is usually enough. A compact 12V model can be easier to manage in tight spaces.
As an Amazon Associate we earn from qualifying purchases at no extra cost to you.



What we cover
What to look for in an impact driver
Prioritize a low-speed setting or multiple drive modes. Cabinet screws often need less force than deck or structural screws, and a slower mode gives you more time to stop before the head sinks too far. A variable-speed trigger matters, too: it lets you start gently and increase speed once the screw has caught.
For installing cabinets, a tool around 4 to 6 inches long is easier to maneuver inside a cabinet than a bulky high-torque model. A 12V driver may be sufficient for typical cabinet screws; an 18V or 20V tool is a better all-around choice if you also drive longer screws or already own batteries in that system. Check the tool’s weight with its battery attached. A few ounces can make a difference when working overhead or holding a cabinet in place.
A cordless impact driver with multiple speed modes is a sensible buy if you regularly install cabinets or do other fastening work. If you only need to hang one kitchen, a lower-cost driver with a good trigger and a suitable bit is fine.
Choosing a driver for cabinet screws
| Option | Best for | Trade-off |
|---|---|---|
| 12V impact driver | Light-duty cabinet work and tight spaces | May have less runtime and power for repeated long screws |
| 18V or 20V impact driver | Frequent use and a broader range of fastening jobs | Often heavier and more tool than a one-time project needs |
| Drill/driver | Maximum control on delicate work | Slower on long screws; can twist your wrist if a bit binds |
| Basic impact driver without drive modes | Occasional use on a budget | Requires a lighter trigger touch and more care near the screw head |
If you already have a cordless drill, try it before buying another tool. A drill’s clutch can limit torque, which is useful for smaller screws and delicate materials. For longer cabinet screws, an impact driver is generally faster and less likely to kick back when the screw meets resistance. Neither tool eliminates the need for a pilot hole in a face frame.
Use the right screw and bit
For joining cabinet face frames, use cabinet or trim-head screws intended for the job, not drywall screws. Drywall screws are brittle and their bugle-shaped heads can damage wood. Use a screw long enough to pass through the first frame member and get adequate purchase in the second, but not so long that it risks breaking through a visible surface. The right length depends on frame thickness and joint layout; measure the parts rather than guessing.
Use the driver bit that fits the screw head snugly. A loose bit can cam out, chew up the recess, and leave a damaged head that is hard to remove. Keep a spare bit nearby: worn tips slip more often, especially with Phillips screws. A set of impact-rated driver bits is useful if you do this work often, but an ordinary, undamaged bit is adequate for a small project.
Predrill the face frame. Choose a pilot bit sized for the screw’s core diameter—the solid shaft between the threads—and test on scrap if you are unsure. The pilot hole should let that core pass without forcing the frame apart, while leaving enough material for the threads to grip. Countersink only if the screw head is designed to sit flush; over-countersinking weakens the surface around the screw.
A controlled way to drive the screws
Clamp the frames flush before fastening. A screw can pull two frames out of alignment, particularly near an edge or when the pilot hole is too small. Check the joint, drill the pilot, then drive the screw with the tool held straight. Start slowly until the threads bite. Once the screw is moving, use steady pressure and ease off as the head approaches the wood.
Stop when the head is seated, not when the tool has delivered every bit of its force. A head driven below the surface can crush the frame fibers or strip its recess; a screw that keeps spinning without advancing may have stripped the wood. Back it out, inspect the hole, and use a better-sized pilot or a suitable repair rather than repeatedly driving the same screw into loose fibers.
For more control, set the tool to its lowest speed or gentlest mode and finish with a hand screwdriver if the screw is close to a frame edge or the wood is soft. Do not rely on an impact driver’s torque specification to judge whether a setting is safe: those ratings describe the tool, not the amount of force a particular joint can tolerate.
When a more expensive driver is worthwhile
Pay extra for a compact body, a useful low-speed mode, and batteries you can share with tools you already own. A bright work light is handy inside cabinets, but it should not outweigh balance or trigger control. Brushless motors can improve efficiency and runtime, though they are not essential for a few dozen screws.
Skip premium power if the job is occasional and your existing drill can handle it. Spend instead on sharp pilot bits, correctly sized cabinet screws, clamps, and a bit that fits the head. Those choices prevent more face-frame problems than extra torque ever will.