What's inside
As an Amazon Associate I earn from qualifying purchases. This post may contain affiliate links at no extra cost to you.
What we cover
Choose the anchor for the load
For a bracket attached to a basement floor, the best anchor depends on what the bracket will hold, the concrete condition, and whether you may need to remove it later. A light shelf standard or conduit clip does not call for the same fastener as a post base, heavy equipment bracket, or anything that could injure someone if it pulls loose.
For many ordinary brackets, a correctly installed 1/4-inch concrete screw is the simplest choice. It is removable, needs only a drilled pilot hole, and avoids the setting tools and expansion force of some alternatives. For heavier or safety-critical loads, use an anchor specified for that application and follow its published load ratings and installation instructions. Do not choose by diameter alone: embedment, concrete strength, edge distance, spacing, and the bracket’s leverage all affect capacity.
As an Amazon Associate we earn from qualifying purchases at no extra cost to you.
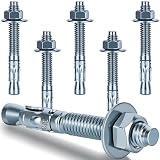


If you do not know the bracket’s expected load, or it will support a vehicle, guardrail, structural post, or overhead load, stop and get guidance from the bracket manufacturer or a qualified professional. A general-purpose anchor recommendation is not a substitute for an engineered connection.
Anchor types compared
| Anchor type | Good fit | Main trade-off |
|---|---|---|
| Concrete screw | Light to medium brackets; removable installations | Needs a correctly sized, clean pilot hole; threads can lose grip in damaged concrete |
| Wedge anchor | Heavy brackets in sound, sufficiently thick concrete | Permanent and expansion force makes edge distance and spacing important |
| Drop-in anchor | Threaded bolts that may need to be removed and replaced | Requires a matching setting tool and careful installation |
| Adhesive anchor | Specified heavy-duty applications where the design allows it | Hole cleaning, temperature, cure time, and product instructions are critical |
For a straightforward bracket, start by checking whether its holes accept a common screw size. A 1/4-inch concrete screw is often a practical buy for modest loads in sound concrete. Confirm the required bit diameter and minimum embedment on the package; different products do not all use the same pilot-hole size or installation rules.
Match the drill and bit
Concrete screws require a hole drilled to the manufacturer’s specified diameter and depth. A carbide-tipped masonry bit is essential. For a few shallow holes in ordinary concrete, a hammer drill can work, but it is slower than an SDS-plus rotary hammer as the holes get larger or the concrete gets harder. A regular drill without hammer action may struggle, overheat, or polish the hole instead of cutting it.
Use a rotary hammer for repeated holes or larger anchors; its hammering mechanism generally drills concrete more efficiently than a typical hammer drill. For one small bracket, buying a rotary hammer may not make sense. Borrowing one or using a capable hammer drill is reasonable if it can maintain speed without overheating. Keep the bit straight, use the depth stop or mark the required depth, and wear eye and hearing protection.
Do not use a worn or undersized bit. A hole that is too large can leave a concrete screw with little to bite into; a hole that is too small can make installation difficult or damage the fastener. Clean dust from the hole as the product instructions specify. Dust left behind can interfere with grip, especially with adhesive anchors.
Installation and common failures
Before drilling, check the slab for radiant-heat tubing, electrical conduit, plumbing, and post-tension cables. Do not assume a basement slab is clear. Review plans if available and use an appropriate scanning tool; if you suspect post-tensioning or cannot verify what is below, do not drill until you have professional guidance.
Position the bracket away from slab edges, cracks, and joints unless the anchor’s instructions explicitly allow that location. Expansion anchors push outward against the concrete, so placing one too close to an edge can split or spall the slab. Concrete screws avoid that particular expansion action, but still need sound material and adequate edge distance. Do not put an anchor into a crack and expect tightening to fix the problem.
Drill perpendicular to the floor and to the correct depth. For concrete screws, start the fastener square and drive it with a suitable driver at controlled speed. Stop if it spins without tightening, stalls well before seating, or breaks out a chunk of concrete. Those are signs of a bad hole, weak concrete, or incorrect installation—not a reason to simply install a larger screw into the same damaged spot.
With a wedge anchor, use the specified hole diameter and depth, seat it as directed, and tighten to the stated torque if one is provided. Over-tightening can damage the anchor or concrete. With a drop-in anchor, use the matching setting tool; an improperly set anchor may appear secure but fail when loaded. Adhesive anchors need the specified cleaning steps and full cure time before loading. Cold basement temperatures can lengthen curing, so follow the product data rather than guessing.
When a cheaper anchor is enough
For a light-duty bracket that carries little weight and has multiple fasteners, a basic concrete screw can be entirely adequate when the concrete is sound and installation matches the instructions. Spending more on a heavy expansion or adhesive system does not automatically make a low-risk connection better. It can add cost, installation steps, and damage that is difficult to reverse.
For heavier loads, a wedge anchor may be appropriate if the slab thickness, edge distance, spacing, and load meet its specifications. If the bracket will see vibration or repeated pulling, check the manufacturer’s guidance rather than assuming a general-purpose fastener is suitable. When there is no reliable load information, choosing an anchor based on a guessed capacity is the wrong economy.
After installation, inspect the bracket for movement and check that each fastener is seated as specified. Do not treat a quick tug test as proof of a rated connection. If the concrete cracks, the anchor spins, or the bracket flexes under its intended load, unload it and reassess the mounting location and anchor choice before use.