What's inside
As an Amazon Associate I earn from qualifying purchases. This post may contain affiliate links at no extra cost to you.
Drilling ceramic tile is less about brute force than control. The right bit has a carbide cutting tip, starts without wandering, and removes material slowly enough that heat does not crack the glaze. A standard twist bit may skate across the surface, while a masonry bit can chip the finish if used too aggressively.
For most bathroom and kitchen work, a carbide-tipped tile bit is the practical choice. It is inexpensive, works with an ordinary cordless drill, and makes clean holes for wall anchors, towel bars, shelves, and plumbing hardware. If you are drilling through hard porcelain, stone tile, or a large number of holes, the choice changes.
As an Amazon Associate we earn from qualifying purchases at no extra cost to you.


What we cover
Choose the right bit for the tile
“Ceramic tile” covers a wide range of materials. Soft ceramic wall tile is relatively easy to drill. Dense porcelain is much harder and often requires a diamond-grit bit, especially for holes larger than about 1/4 inch. Natural stone has its own requirements and should not be treated like ordinary glazed ceramic.
| Tile and hole type | Best bit | Typical use | Main trade-off |
|---|---|---|---|
| Soft ceramic wall tile, small holes | Carbide-tipped tile bit | Wall anchors, hooks, small brackets | Affordable, but slower and less durable than diamond |
| Hard porcelain, small holes | Diamond-grit tile bit | Bathroom accessories and fasteners | Cleaner cutting, higher cost |
| Large holes in ceramic or porcelain | Diamond hole saw | Pipe penetrations and larger fixtures | Requires water or careful cooling |
| Tile plus wood or drywall behind it | Carbide tile bit, then suitable material bit | Anchors and mounting hardware | One bit may not work well through every layer |
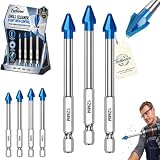
For basic ceramic tile, look for a carbide-tipped ceramic tile drill bit set with sizes from roughly 1/8 to 1/2 inch. A pointed carbide tip is easier to start than a blunt masonry bit. A spear-point or arrowhead design helps keep the bit from skating across the glossy surface.
Carbide versus diamond bits
Carbide-tipped bits are the value option. They generally cost less per bit, work well in soft and medium ceramic tile, and are suitable for the occasional home repair. They should be used at low speed with light pressure. The cutting edge can chip if it is forced, overheated, or allowed to catch as it breaks through the tile.
Diamond-grit bits grind through the tile instead of cutting it with a small edge. They are usually the better choice for porcelain, glass tile, very hard glazed tile, and repeated drilling. A diamond-grit tile drill bit set costs more, but it is less likely to fail when carbide struggles.
Do not assume a diamond bit is automatically better for every job. Small diamond bits can wear quickly if run dry and hot. Carbide is perfectly adequate for drilling four or six holes in ordinary ceramic wall tile. The cheaper option is fine when the tile is soft, the hole is small, and you can work patiently.
Use the drill correctly
Turn hammer mode off. The impact from a hammer drill can crack the tile or blow out a crater around the hole. An impact driver is also a poor first choice because its repeated impacts can damage the tile and make speed difficult to control. Use a cordless drill or corded drill in standard rotation.
Set the drill to its lowest or middle-low speed. A useful starting range is about 300 to 600 rpm for carbide bits. Press firmly enough to keep the bit cutting, but do not lean your full weight into it. Excessive pressure creates heat and can fracture the tile around the hole.
For a carbide bit, pause every 10 to 20 seconds to let the tip cool. You can touch the bit only after stopping and allowing it to cool; a hot carbide tip can lose its temper or loosen in its holder. Water cooling is helpful, but keep water away from the drill’s battery, motor vents, and electrical connections. For occasional small holes, a short pause is usually safer and simpler than flooding the work area.
A reliable drilling method
First, confirm what is behind the tile. Do not drill where electrical cable or plumbing may run. A stud finder can help, but it is not a guarantee. If the fixture will carry weight, identify the framing or use an anchor rated for the wall material rather than relying on the tile itself.
Mark the hole with a pencil or fine marker. Place a small square of painter’s tape over the mark. The tape adds friction and makes the starting point easier to see, although it will not rescue a bit used at high speed.
Start the bit perpendicular to the tile with the drill running slowly. Keep the drill steady until the bit forms a shallow ring or divot, usually after 10 to 30 seconds. Once it is tracking, increase pressure slightly and continue until the carbide tip passes through the tile.
As soon as the bit enters the wall cavity or backer board, stop and inspect the hole. Switch to a bit suited to the material behind the tile. For wood, use a standard twist or brad-point bit. For concrete or masonry, use a masonry bit, and enable hammer mode only after the tile is completely cleared. For drywall, use the appropriate anchor-size bit or let the anchor cut its own hole if its instructions allow it.
Match the hole to the anchor
The tile hole should match the anchor manufacturer’s specified diameter, not simply the screw diameter. Common small plastic wall anchors use holes around 1/4 inch, 5/16 inch, or 3/8 inch, but sizes vary. Read the package before drilling. A hole that is too large may let the anchor spin; a hole that is too tight can split the tile when the anchor is driven in.
For tile over drywall, ordinary expansion anchors are suitable only for light loads. Towel rings, small shelves, and hooks should ideally be fastened into a stud or mounted with a toggle-style anchor when the wall construction permits. Tile is a finish surface, not structural support. Use a tile wall anchor kit for bathroom accessories only after checking its load rating and the material behind the tile.
Common failures to avoid
The most common mistake is starting too fast. The bit wanders, scratches the glaze, and may create a chipped crescent around the hole. The second is using hammer mode before passing through the tile. Another is forcing a worn bit. If a carbide bit has drilled several holes and now produces dust slowly while heating rapidly, replace it rather than increasing pressure.
Never use a regular metal drill bit as a substitute on glazed tile. It may cut soft ceramic briefly, but the sharp edge can skate and dull quickly. Likewise, do not use a large hole saw without a guide or steady hand; once the rim catches, it can crack the tile or jerk the drill into the surface.
For a few holes in standard ceramic tile, buy a modest carbide set and drill slowly. For porcelain, thick tile, large holes, or an expensive finished surface, spend more on diamond grit and practice on a spare tile first. That small decision usually costs less than replacing a cracked tile and repairing the wall behind it.