What's inside
As an Amazon Associate I earn from qualifying purchases. This post may contain affiliate links at no extra cost to you.
Tile is hard, brittle and unforgiving of a wandering bit. The right choice depends less on the drill you own than on the tile material, hole size and how many holes you need. For most finished tile, a diamond bit is the safer choice. A carbide-tipped masonry bit can work on some ceramic tile, especially for an occasional small hole, but it takes more care and is a poor bet for porcelain.
As an Amazon Associate we earn from qualifying purchases at no extra cost to you.



What we cover
The quick answer
Choose a diamond bit for porcelain, glass tile, large holes, or a job where cracking a tile would be expensive. Choose a carbide-tipped masonry bit for a small hole in ordinary glazed ceramic when cost matters and you can drill slowly and carefully. Neither type should be used with hammer action while cutting through tile.
Once the bit has passed through the tile and reached the wall behind it, the tool choice may change. Use a masonry bit and hammer mode only if the substrate is masonry and the hole is already clear of tile. For drywall, wood studs or metal, use the appropriate bit instead.
How the bits cut
A diamond tile bit has diamond abrasive bonded to its cutting edge. It grinds through the tile rather than slicing it with a sharp point. Many small diamond bits are hollow-core, while larger hole saws have a diamond-coated rim. They need steady pressure, low speed and cooling to keep the abrasive from overheating.
A carbide masonry bit has a hard carbide tip and usually cuts by chipping. That works well in brick and concrete, but the impact-like action can make a brittle tile chip or crack. Some carbide bits are sold for tile; check the maker’s instructions, since a standard masonry bit is not automatically suitable for every tile surface.
Diamond vs. carbide at a glance
| Factor | Diamond bit | Carbide-tipped bit |
|---|---|---|
| Best fit | Porcelain, glass, hard ceramic, larger holes | Small holes in softer ceramic; also the wall behind tile if appropriate |
| Cutting action | Grinding | Chipping |
| Typical pace | Slow; keep the rim cool | Can be quicker in soft tile, but needs a gentle start |
| Common failure | Overheating, glazing over or wearing out | Skating, chipping glaze or cracking tile |
| Cost trade-off | Higher initial cost; useful for tougher tile and repeated holes | Cheaper and adequate for some one-off ceramic holes |
Choose by tile and hole
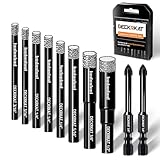
Porcelain is dense and usually harder to drill than standard ceramic. For a towel bar, shower fitting or other hole through porcelain, use a diamond bit sized for the anchor or fastener. A diamond tile bit set can cover common small diameters, but check that the bit is rated for your tile and intended hole size. For a large pipe opening, use a matching diamond hole saw, not a small twist-style bit.
On softer glazed ceramic, a sharp carbide bit made for tile can be a reasonable low-cost option for a few small holes. It may skate on the smooth glaze, so mark the center carefully and use a guide or a strip of masking tape to help control the start. Tape does not make the tile crack-proof; it just gives the bit a less slippery starting surface.
If you are unsure what the tile is, treat it as porcelain: drill a short test hole in an offcut or an inconspicuous spot, or use diamond. A cheap bit is not a bargain if it chips a visible tile or forces you to replace it.
How to drill without cracking tile
Use a variable-speed cordless drill or drill/driver in its normal drilling setting. Turn off hammer mode and avoid an impact driver. Start slowly, keep the drill square to the surface, and use light, steady pressure. Do not lean hard on the drill; excessive force can make the bit bind, overheat or break through suddenly.
Diamond bits need cooling. For a small hole, dip the bit in water frequently or use a controlled trickle around the cutting edge, keeping water away from the drill and electrical connections. Follow the bit manufacturer’s directions. A dry-use bit is an exception, not a reason to run any diamond bit dry. If the cut starts producing little or no dust and progress stalls, the bit may be hot or glazed; stop, cool it and let it recover rather than pushing harder.
For holes near an edge or corner, be especially cautious. Tile is most vulnerable there, and a hole too close to an edge can split the piece even with the right bit. Keep the hole center several times the hole diameter from the edge where the layout allows, and avoid drilling directly into grout unless the fixture instructions call for it.
After the bit clears the tile
Stop as soon as the bit breaks through the tile. Continuing with a tile bit can waste its cutting edge against the substrate. Switch to a bit suited to the wall material and keep hammer mode off until the bit is fully through the tile. If drilling into concrete or brick, a masonry bit can then be used; use hammer action only after the tile is safely cleared.
Choose the anchor for the wall, not just the tile. Tile alone is not a reliable anchor surface. A fixture that will carry weight should be fastened into a stud, masonry or an anchor rated for the backing material. Match the hole diameter to the anchor maker’s instructions, and do not enlarge the hole by wobbling the drill.
What to buy for a typical job
For one or two small holes in inexpensive ceramic, a suitable carbide tile bit may be enough. For porcelain, several holes, or a visible installation where a chipped edge would be costly, buy diamond. A diamond tile hole saw is the right category for larger circular openings; confirm its diameter and whether it requires wet use.
Before starting, verify the tile type, bit diameter, anchor size and wall material. Use a drill with speed control, keep hammer action off on the tile, and plan how you will cool a diamond bit. Those checks do more to prevent a ruined tile than buying the most expensive bit on the shelf.