What's inside
As an Amazon Associate I earn from qualifying purchases. This post may contain affiliate links at no extra cost to you.
A wall-mounted tool organizer can put a lot of leverage on a few small fasteners. A drill hanging near the edge of a hook pulls outward as well as down, and a loaded rail can work loose if it is attached only to drywall with the wrong anchor. Choose anchors for the wall material, the organizer’s load, and how far that load sits from the wall—not just the number printed on the package.
As an Amazon Associate we earn from qualifying purchases at no extra cost to you.


What we cover
Check the wall and load first
Use a stud finder and confirm likely stud locations with a small pilot hole. If you can fasten the organizer to wood studs, do so: screws driven into studs are generally the most reliable choice for heavy tools. For a rail that crosses studs, use stud screws where possible and anchors only at the remaining holes.
If there is no stud where a mounting point needs to go, identify the wall construction. This guide covers hollow drywall and plasterboard. Masonry needs different fasteners; old plaster over lath may need a different approach from modern drywall. Don’t assume an anchor rated for drywall is suitable for either.
Weigh the tools you plan to store, then account for uneven loading. A tool organizer rated for a certain total load does not mean each hook or each anchor can carry an equal share. A heavy drill at the end of a rail can put more stress on nearby fasteners than the same weight spread evenly across it. Use the organizer maker’s mounting instructions and the anchor maker’s rating for your exact wall thickness. Ratings vary, and some are for pull-out while others describe a different test condition.
Which anchor type makes sense?
| Anchor type | Best use | Trade-off |
|---|---|---|
| Self-drilling plastic anchor | Light loads and simple installation in drywall | Cheap and quick, but limited holding power and more vulnerable to a loose hole or repeated loading |
| Metal self-drilling anchor | Light-to-moderate loads when the hole is clear of studs | Installs quickly, but still relies on drywall and can damage the board if overtightened |
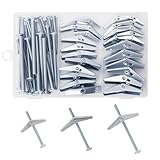
| Toggle bolt | Moderate loads with enough cavity space behind the board | Spreads load across the back of drywall; requires a larger hole and clearance for the toggle |
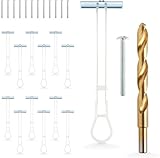
| Strap-style toggle | Heavier loads or repeated use where a secure drywall fixing is needed | Costs more and needs a larger drilled hole, but is easier to position than a loose toggle |
For a small organizer holding a few light accessories, a self-drilling drywall anchor can be a reasonable low-cost choice. It is not the default for a rack full of drills, batteries, or metal tools. The threads bite into the face of the drywall; they do not turn it into solid wood.
Choose for a loaded rack
For a tool organizer carrying several pounds, a toggle-style fastener is usually a better drywall-only option than a basic plastic anchor. A strap-style toggle anchor spreads the load behind the wallboard. Check the package for the supported drywall thickness and required hole diameter. The toggle must open fully inside the cavity; insulation, pipes, blocking, or a close-fitting cabinet can prevent that.
A traditional toggle bolt can also work and is often inexpensive. It needs a hole large enough for the folded toggle to pass through, and the bolt and toggle can fall into the wall if you remove the screw. That is usually fine for a one-time mount, but less convenient if you expect to take the organizer down.
For a genuinely heavy collection, don’t solve the problem by adding more drywall anchors at random. Mount a plywood backer across two or more studs, then attach the organizer to the backer. This gives you more freedom to place the rail and hooks, and it transfers the load into framing. A heavier tool load, a long cantilevered organizer, or frequent removal is a good reason to use a backer or locate studs rather than trust drywall alone.
Install without weakening the fixing
Lay out the organizer level and mark every hole. Check each point for a stud and for hidden wiring or plumbing before drilling. Use the drill bit size specified by the anchor maker: a hole that is too large can let an anchor spin, while an undersized hole can crush drywall or prevent a toggle from opening. Use a drill rather than an impact driver for making the hole; an impact driver can make it easy to oversize or tear up the opening.
Seat the organizer flat against the wall and tighten screws until snug. Do not keep driving after the anchor stops turning or the mounting plate begins to deform. Over-tightening can strip a self-drilling anchor, crush the drywall face, or pull a toggle’s bearing plate into the board. If an anchor spins during installation, stop. Remove it and use a repair method or a new fixing in sound material rather than relying on the damaged hole.
Load the organizer gradually. Start with lighter tools, then add weight while watching for movement, crushed drywall, or a growing gap behind the rail. A fixing that shifts, clicks, or leaves a widening dent is failing; unload it and remount into studs or a suitable backer. Keep especially heavy tools close to a stud-supported mounting point, and avoid using a drywall-only anchor for a tool that could injure someone if it falls.