What's inside
As an Amazon Associate I earn from qualifying purchases. This post may contain affiliate links at no extra cost to you.
The right bit depends on what broke and where it broke. A screw extractor is useful when the head is damaged but the screw is still accessible; it is often the wrong choice for a hardened, flush-cut fastener. For that, a left-hand drill bit or a small cobalt bit may be a better first step. Before buying a kit, identify the fastener material, its diameter, and whether you can keep the drill centered.
As an Amazon Associate we earn from qualifying purchases at no extra cost to you.


What we cover
Choose the right tool for the failure
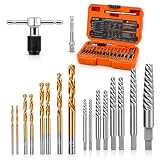
“Broken screw bit” kits usually combine a pilot bit with a tapered extractor. The pilot makes a hole, then the extractor bites into it as you turn counterclockwise. This works best on ordinary steel screws with enough material left to grip. It is not a cure-all: a hardened extractor can snap in the fastener, and the resulting piece is extremely difficult to drill.
A left-hand drill bit cuts while spinning counterclockwise. Sometimes it backs the screw out during drilling, so no extractor is needed. A cobalt bit is a tougher cutting option for harder steel, but it does not automatically remove a screw; you still need to drill accurately and may need an extractor afterward.
Which bit type should you buy?
| Bit or tool | Best for | Main trade-off | Typical use |
|---|---|---|---|
| Left-hand drill bit | Broken steel screws with a reachable center | Can walk off-center; may not loosen the screw | Drill slowly in reverse, starting with a small pilot |
| Twist screw extractor | Stripped heads or drilled pilot holes in softer fasteners | Can snap if forced or used in hardened steel | Turn by hand with a tap wrench or small wrench |
| Cobalt drill bit | Harder steel where ordinary bits dull quickly | Costs more and still needs careful alignment | Use cutting oil and moderate speed |
| Carbide-tipped masonry bit | Concrete or masonry anchors, not steel screws | Wrong choice for metal; impact can damage a fastener | Use for the surrounding masonry only |
For occasional household repairs, a small left-hand drill bit set is a sensible first purchase. Choose one with several sizes, including bits around 1/8 inch and 3/16 inch. For frequent work on damaged screws, a combined extractor and left-hand bit set saves shopping for compatible sizes. A basic set is fine for soft steel and small screws; pricier kits are worthwhile mainly when the bits are accurately sized and you expect repeated jobs.
Match the bit to the fastener
For a small wood screw with a broken head, first check whether the remaining shank can be gripped with locking pliers. That is often safer than drilling. If it is flush or recessed, center-punch the fastener and drill a small pilot. A punch mark helps keep the bit from skating across the surface, especially on a screw head or metal bracket.
For a steel bolt snapped flush, start with a left-hand bit smaller than the fastener’s core diameter. Drill straight and check whether the bolt begins to turn out. If it does not, increase the pilot size only as needed, then use an extractor sized for that hole. Do not drive a tapered extractor deep into a small pilot: its wedging force can expand the broken screw and make it tighter.
Use cobalt bits for tough steel rather than assuming a standard high-speed steel bit will cut it. Carbide bits can cut very hard materials but are brittle and easy to break if the drill wobbles. They are not a general-purpose upgrade for screw removal.
Drill and extract without making it worse
Secure the workpiece, wear eye protection, and mark the center with a center punch. Use a variable-speed drill in reverse for a left-hand bit; keep the bit square to the fastener and use light, steady pressure. Start around 300–600 rpm for small bits in steel, slowing down if the bit squeals, heats rapidly, or stops making chips. A few drops of cutting oil reduce heat and help the edge last.
When using an extractor, turn it by hand with a tap wrench or small wrench. Keep the force controlled and stop if the extractor twists without moving the screw. Avoid an impact driver: hammering action can snap a brittle extractor, and the high torque makes it easy to overdo the force. A cordless drill with a clutch is useful for drilling, but extraction calls for feel rather than speed.
If the pilot drifts off-center, stop before it reaches the threads. A damaged hole may leave too little material for the extractor to bite. For an expensive part, a machine shop may be cheaper than ruining the component. On a low-cost bracket, drilling the fastener out and repairing or enlarging the hole may be the practical route.
Common mistakes and when to stop
The most common failure is using too much torque. Extractors are hard but brittle: if one breaks, a standard drill bit usually will not cut it. Another is drilling at high speed without oil, which overheats the cutting edge and can harden the fastener surface. A dull bit that rubs instead of cutting is a sign to stop, cool the work, and reassess.
Also avoid choosing a masonry bit for a metal fastener or using a hammer drill’s hammer mode. Hammer action is for masonry, not precision drilling into a screw. If the broken fastener is stainless steel, hardened, badly off-center, or smaller than roughly 1/8 inch, removal gets less forgiving. Use a sharp cobalt bit, secure the work, and consider professional help before an extractor snaps.