What's inside
As an Amazon Associate I earn from qualifying purchases. This post may contain affiliate links at no extra cost to you.
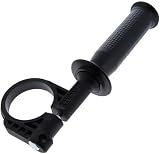
A side handle gives you a second grip on a cordless drill when a large bit, hole saw or mixer attachment starts to twist the tool. It is not a torque limiter, and it cannot make an undersized drill safe for every job. The right handle should fit the drill’s collar, stay put under load and let you brace the tool without putting your hands in the bit’s path.
As an Amazon Associate we earn from qualifying purchases at no extra cost to you.

What we cover
When a side handle matters
For small pilot holes and ordinary screwdriving, a side handle usually adds bulk without much benefit. It becomes useful with large auger or spade bits, hole saws, long ship augers and other attachments that can bind in wood. Hammer drilling in masonry can also be easier to control with two hands, though the handle does not replace proper footing or eye protection.
The main hazard is reaction torque: if a bit catches, the drill body can rotate suddenly around the bit. A side handle gives you another point of control, but a strong jam can still wrench your wrist or shoulder. Use the drill’s low gear for large bits, keep both hands on the tool and stand so you can let it stop without falling. Do not grip the rotating chuck or hold the workpiece by hand.
Types of side handles
Most factory handles attach to a threaded collar behind the chuck or clamp around the drill’s front housing. They often allow the handle to be moved to either side for right- or left-handed use. The attachment style is not universal: a handle that looks similar may not fit another drill’s collar diameter or thread.
Some drills have a dedicated mounting point; others accept an optional clamp-on handle made for that drill family. A universal clamp can be a practical substitute if it securely matches the housing and does not cover vents, controls or a depth stop. Avoid improvised pipe clamps and handles that depend on friction against a smooth plastic housing. Under torque, they can rotate or slip.
Which option makes sense?
| Option | Best for | Trade-off |
|---|---|---|
| Manufacturer-specific handle | Frequent high-torque work; a drill with a matching mount | Best fit, but availability and compatibility are limited to particular drills |
| Compatible clamp-on handle | Occasional large-bit work on a drill without a factory handle | More adaptable, but fit and clamping security need careful checking |
| No side handle | Small holes, routine fastening and light-duty drilling | Cheapest and least bulky; poor choice when a bit can bind hard |
If your drill’s maker sells a matching replacement or accessory, start there. Search by the exact drill model number, not just the brand. For a compatible replacement, compare cordless drill side handle replacements, then confirm the listing identifies your model or mounting dimensions.
What to check before buying
Mounting fit: Check the drill manual or manufacturer parts diagram for the handle part number, collar thread and mounting location. If buying a clamp-on handle, measure the housing where it will sit. A clamp that is too large may bottom out before it holds; one that is too small can damage the housing when tightened.
Grip and orientation: Look for a handle long enough to hold firmly with a gloved hand and a mounting arrangement that lets you set it on either side. A handle that can rotate to a useful angle is helpful when drilling overhead or close to a wall. Make sure adjustment does not place your fingers near the chuck or work surface.
Materials and attachment: Metal mounting hardware and a solid collar are reassuring, but fit matters more than appearance. Tighten the handle as instructed, then check it before each demanding hole. If the mount shifts during a test in scrap, stop; tightening harder may crack plastic or strip threads rather than solve a poor fit.
If you need an adaptable option, browse universal cordless drill side handles and verify the clamp’s stated diameter range against your tool. Do not assume “universal” means it fits every compact drill.
Use the handle safely
Fit the side handle before installing the bit, and tighten it firmly without forcing the threads. Choose low gear for a large-diameter bit; high speed with a large cutter can make a catch more violent and overheat the motor. Start square to the work, use a sharp bit, and clear chips when the bit manufacturer recommends it. For a hole saw, avoid leaning hard enough to stall the drill continuously.
Keep the battery charged and check whether the drill has an adjustable clutch, mechanical brake or anti-rotation feature. These can help manage a bind, but they do not remove the need for a two-handed grip. If the bit jams, release the trigger rather than trying to muscle through. Reverse only after the tool stops and you have control of it.
For repeated large holes, a drill designed for that load is a better upgrade than an expensive handle on a compact driver-drill. Check the manual for the permitted bit sizes and duty cycle. If the tool overheats, the handle loosens, or you cannot brace it comfortably, stop and change the setup. A cheaper compatible handle is fine for occasional work when it locks securely; for frequent high-torque drilling, a correctly matched factory handle is the safer, less frustrating choice.