What's inside
As an Amazon Associate I earn from qualifying purchases. This post may contain affiliate links at no extra cost to you.
What we cover
What you need for a hinge cup
Most concealed cabinet hinges use a 35 mm cup, bored into the back of the door. The usual cup depth is about 12–13 mm, but check the hinge maker’s drawing: cup diameter, depth, edge setback and screw-hole spacing can vary. A drill bit that cuts a clean 35 mm circle is only part of the job. Bore too deep and you can break through the door face; place the cup too close to the edge and the door may split or the hinge may not fit.
For a one-off repair, a sharp Forstner bit in a cordless drill is usually the sensible buy. For repeated, accurate work, use a drill-press setup or a hinge-boring jig. A large hole saw or spade bit is not a suitable substitute: neither makes the flat-bottomed, controlled bore a hinge cup needs.
As an Amazon Associate we earn from qualifying purchases at no extra cost to you.
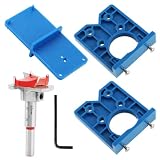


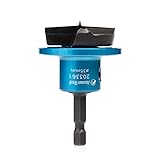
Compare the main bit options
| Bit or setup | Best for | Trade-off |
|---|---|---|
| 35 mm Forstner bit | One door, repairs and small batches | Affordable and widely available; needs steady feed and good depth control |
| 35 mm hinge-boring bit | Repeated hinge-cup holes | Often includes a centering point and geometry suited to hinge cups; costs more than a basic bit |
| Hinge-boring jig with bit | Accurate field work without a drill press | Improves placement and repeatability, but setup takes time and the jig must match the hinge pattern |
| Drill press with Forstner bit | Shop work and multiple doors | Best control over angle and depth; limited by throat capacity and door size |
A quality 35 mm Forstner bit is enough for occasional use. If you are drilling several doors, a dedicated 35 mm hinge-boring bit or a jig can save time and reduce layout errors. Check that the bit has a 35 mm cutting diameter and a shank your drill can accept; product listings sometimes mix hinge bits with unrelated cup bits.
Choosing a bit that cuts cleanly
Forstner bits cut a flat-bottomed hole, which leaves a broad, even seat for the hinge cup. Carbide-tipped versions tend to hold an edge longer in abrasive materials such as particleboard and MDF, while high-speed-steel versions are generally cheaper and can be adequate for occasional work. Either can burn or tear the surface if dull, forced, or run at an unsuitable speed.
Most 35 mm bits have a centering spur and outer cutting rim. The spur helps locate the hole, but it does not replace a jig or careful marking. Before buying, look for a stated 35 mm diameter, a usable cutting depth, and a shank compatible with your drill. A bit with a long shank or large head can be awkward in a compact drill, and a heavy bit puts more strain on a small motor.
A hinge-boring jig helps keep the bore square to the door and sets the cup position consistently. That matters more than buying an expensive bit when you need several matching holes. A 35 mm concealed-hinge jig is worth considering for a kitchen refit or a batch of cabinet doors. For one hole on a flat, thick door, careful clamping and a depth stop may be enough.
Drill, speed and control
Use a standard drill or drill driver, not hammer mode. An impact driver is also a poor choice: its pulsing action makes it harder to control a wide Forstner bit and can damage the workpiece or overload the bit. If using a cordless drill, select low gear for torque and control. Follow the bit maker’s speed guidance; as a general starting point, a 35 mm Forstner bit is commonly run at roughly 500–1,000 rpm, with lower speed favored in dense material or when the drill feels strained.
Clamp the door securely on a sacrificial board. Mark the hinge location from the hinge template or manufacturer’s drawing, then verify the distance from the door edge. Set a depth stop to the specified cup depth, allowing for the bit’s center point if it extends farther than the cutting rim. If you do not have a stop, wrap tape around the bit as a visual warning, but do not treat tape as a mechanical stop.
Boring the cup without damaging the door
Hold the drill square to the door and start slowly enough to keep the bit centered. Let the rim cut; pressing hard can overheat the bit, stall the drill or tear fibers around the opening. Periodically lift the bit to clear chips. Stop as soon as you reach the specified depth. On a thin door, the remaining face veneer may be only a few millimeters thick, so drilling by feel is risky.
Test the fit before mounting the hinge. The cup should sit flat and flush without needing to be hammered in. If it rocks, the bottom may be uneven; if it stands proud, the bore may be too shallow or too small. Do not enlarge a misplaced hole by leaning the bit sideways. That can make an oversized, oval cup seat that will not hold the hinge securely.
Common mistakes and when to spend more
Burn marks usually point to a dull bit, excessive speed, or a feed that is too slow for the cutting action. Torn veneer is more likely when the door is unsupported or the bit breaks through the surface. A drill that repeatedly stalls may be in high gear, low on battery, or simply too small for the bit and material. Let the tool cool rather than forcing it.
For one or two holes, a basic sharp 35 mm Forstner bit is often the cheaper, perfectly adequate option. Spend more on a jig or higher-quality bit when you need repeatable placement, are working in dense stock, or will bore many cups. No bit compensates for the wrong hinge dimensions: confirm the hinge’s cup diameter, depth and edge setback before you drill.