What's inside
As an Amazon Associate I earn from qualifying purchases. This post may contain affiliate links at no extra cost to you.
Laminated plywood is strong, stable, and usually harder on fasteners than ordinary construction plywood. Its thin face veneers can splinter, while the dense glue lines and multiple layers can make a screw suddenly require much more torque. An impact driver is well suited to the job because its hammering action helps drive long screws without forcing your wrist to absorb all the reaction torque.
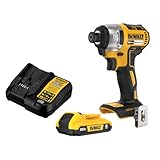
The best choice is not necessarily the most powerful driver. For cabinet panels, shelving, workbenches, and general shop projects, a compact 18V or 20V impact driver with variable speed, a three-LED work light, and a sensible low-speed trigger is usually the most useful combination. Extremely high torque can strip screw heads, crush the laminate, or drive the fastener too far before you can react.
As an Amazon Associate we earn from qualifying purchases at no extra cost to you.



What we cover
What to Look for in an Impact Driver
Most current cordless impact drivers have more than enough power for plywood. Look for a brushless motor if you use the tool regularly; it generally provides better runtime and less maintenance. A compact head is valuable when fastening inside cabinets or close to panel edges, while a larger high-torque model is justified for structural screws and repeated work with 3-inch or longer fasteners.
Three speed settings are more useful than a headline torque number. A low setting helps start screws cleanly and reduces damage to the surface. Medium speed is a good default for most plywood. High speed is useful for long screws, but it can overdrive small screws before you have time to release the trigger.
When comparing tools, pay attention to battery size and balance. A compact 2.0Ah battery keeps a small driver light for overhead or cabinet work. A 4.0Ah or larger battery runs longer and may provide more sustained power, but adds noticeable weight. If you already own batteries in a cordless platform, staying with that system is often cheaper than switching for a small performance gain.
For a general-purpose purchase, compare current brushless cordless impact drivers with a compact body and selectable speeds. A cheaper brushed driver can still handle occasional plywood projects, especially if you use short screws and predrill, but it is usually louder, less efficient, and less refined at low speed.
Which Type Works Best?
| Driver type | Best use | Main trade-off |
|---|---|---|
| Compact 12V impact driver | Cabinets, light-duty panels, 1-1/4 to 2-inch screws | Less reserve for long structural screws |
| 18V or 20V brushless impact driver | Most plywood projects and regular shop use | Heavier and more expensive than basic models |
| High-torque 18V or 20V model | Structural screws, thick assemblies, repeated heavy fastening | Easier to strip screws and damage veneers |
| Cordless drill with clutch | Small screws, delicate laminate, controlled final tightening | Slower on long screws; can stall under high load |
A 12V impact driver is enough for many plywood jobs. It is particularly pleasant for assembling cabinets and fixtures because it is light and easy to control. Choose an 18V or 20V model if you routinely drive 2-1/2-inch screws, work with thick laminated panels, or need to fasten into plywood edges. A high-torque model is rarely necessary for ordinary furniture construction.
Use the Right Bits and Screws
Impact drivers require bits made for impact use. These bits have a torsion zone designed to flex under repeated hammering. Standard twist bits and inexpensive screwdriver bits can snap, especially when driving large screws or working at an angle. A set of impact-rated screwdriver bits is a worthwhile purchase.
Use the exact bit size that fits the screw recess. A loose Phillips bit will cam out and chew up the head; a slightly worn bit makes the problem worse. Torx or square-drive screws generally resist cam-out better than Phillips screws, particularly when driving into dense plywood layers.
For most indoor panels, trim-head or cabinet screws give a cleaner result than large construction screws. Use washer-head or structural screws when clamping strength matters more than appearance. Match the screw length to the joint. A screw should pass through the first panel and penetrate the second member by roughly 1 to 1-1/2 inches, without breaking through the back.
How to Drive Screws Without Damage
Mark the location and clamp the panels before driving. Laminated plywood can shift when the screw threads grab, leaving a step between pieces. For edge fastening, stay at least 3/8 inch from the edge on thinner plywood and increase that distance on larger screws. A screw too close to the edge can split a veneer or force the laminations apart.
Predrilling is the most reliable way to prevent splitting and surface breakout. For a typical #8 screw, drill a clearance hole through the top panel and a pilot hole into the lower panel. A 1/8-inch or 9/64-inch pilot is common for many hardwood-faced plywood applications, but check the screw’s actual core diameter rather than relying on a fixed size. In soft plywood, a smaller pilot may hold better; in dense birch plywood, a larger pilot reduces driving force and splitting.
Set the impact driver to low speed and start the screw perpendicular to the surface. Keep firm pressure behind the bit so it stays seated. Once the threads bite, increase speed only if necessary. Stop when the head is flush or when the washer contacts the surface. Do not rely on the impact mechanism to tell you when the screw is tight: by then, the head may already be buried.
An impact driver has no conventional clutch, so use short trigger pulses for the final few turns. For visible cabinet faces or thin laminate, a cordless drill with an adjustable clutch may produce a cleaner, more repeatable finish. The cheaper option is fine if you already own one and are driving only small screws.
Common Failures and Fixes
If the screw strips immediately, stop using the current bit. Replace it, switch to a better screw drive such as Torx, and reduce speed. If the laminate chips around the hole, use a sharp brad-point bit for the clearance hole and place painter’s tape over the area before drilling. Tape is not a substitute for a sharp bit, but it can reduce minor surface chipping.
If the screw spins without tightening, it has likely stripped the plywood fibers or entered a void. Move the fastener at least 1/2 inch if the design allows, use a slightly longer screw, or add a threaded insert where repeated disassembly is expected. If the screw breaks, the driver is probably set too aggressively, the bit is misaligned, or the fastener is too large for the pilot hole.
For most people, a compact brushless 18V or 20V impact driver, impact-rated bits, and a small drill for pilot holes cover nearly every laminated-plywood task. Spend more on battery compatibility and control than on maximum torque. Careful drilling and a light trigger hand will improve the finished joint more than another 500 inch-pounds of advertised power.