What's inside
As an Amazon Associate I earn from qualifying purchases. This post may contain affiliate links at no extra cost to you.
An impact driver is a useful choice for fastening roof sheathing, especially when the job involves many screws or a cordless setup. But more torque is not automatically better. The right tool should drive the specified fastener without stripping its head, breaking it, or pulling it too deep into the panel.
As an Amazon Associate we earn from qualifying purchases at no extra cost to you.



What we cover
What the job needs
Start with the sheathing and fastening schedule, not the tool’s maximum torque figure. Roof panels are commonly 7/16-inch OSB or plywood, but thickness and required fastener spacing vary. Follow the plans, local code, and panel manufacturer’s instructions. A common layout uses closer spacing at panel edges than in the field, but do not assume a generic pattern overrides your project’s requirements.
Use screws approved for the intended structural connection and exposure conditions. Ordinary drywall or deck screws are not substitutes for specified sheathing fasteners. Check the screw maker’s instructions for compatible bit type, minimum penetration, and whether the fastener is approved for this application.
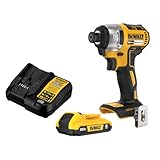
For a roofing crew or a large sheathing job, compare cordless impact driver kits. For a few panels, a basic 18V or 20V-class brushless driver may be plenty; a higher-priced model is more compelling if you already own its battery platform or need better control and durability for frequent work.
Impact driver or drill?
An impact driver delivers short rotational blows as resistance rises. That action helps with long or repeated fasteners, and the compact body is convenient on a roof. The trade-off is less fine feedback: a screw can go from seated to overdriven quickly, particularly in thin panel edges. A drill offers smoother control, but may need more effort or a pilot hole for larger screws.
Choose a driver with a variable-speed trigger and, ideally, a low-speed mode or adjustable driving settings. A low setting makes it easier to seat fasteners consistently. The highest mode can be useful for faster driving in field areas, but it is not a shortcut around careful depth control.
Features worth paying for
For occasional work, the least expensive tool in a battery system you already own is often the sensible buy. Spend more when the driver will see regular framing or roofing use, or when improved control, a brushless motor, weather resistance, or a longer warranty matters. Tool-only pricing is attractive only if you have compatible batteries and a charger.
Look for a comfortable grip, a belt hook, a bright work light, and an easy-to-change 1/4-inch hex chuck. These are practical, not essential. Brushless models usually run more efficiently and may offer longer service life under heavy use, but they do not guarantee a straighter screw or better finished work.
A compact brushless impact driver is a strong all-around category choice for repeated fastening. If you already have batteries from a major tool platform, staying with that system usually saves money and avoids carrying another charger.
How to choose by workload
| Situation | Practical choice | Main trade-off |
|---|---|---|
| A few panels or occasional repairs | Entry-level cordless driver on an existing battery platform | Less refinement, but adequate for modest use |
| Several rooms or routine framing work | Brushless driver with variable speed and a low mode | Higher upfront cost; better control and efficiency |
| Frequent production sheathing | Durable brushless model, spare batteries, and a proven screw-and-bit setup | More investment; reduces interruptions, not installation errors |
| Very precise or delicate fastening | Drill/driver with adjustable clutch, where the fastener permits | Slower driving and potentially more effort on long screws |
Bits and fasteners matter as much as the tool
Match the bit exactly to the screw recess. A loose-fitting Phillips or Torx bit can cam out, round the head, and leave a fastener that is difficult to remove. Replace worn bits; a fresh bit is inexpensive insurance on a large job. Keep the driver’s hex chuck clean so the bit seats fully.
Use screws with the length and head style specified for the assembly. A screw that is too short may not achieve required holding power; one that is too long can protrude where it should not. Confirm edge distances and spacing before fastening, since a powerful driver cannot fix a misplaced fastener.
Drive consistently without damaging panels
Hold the driver square to the panel and start at low speed. Let the screw threads pull the fastener in; leaning hard on the tool encourages a tilted screw and can crush the panel surface. Stop when the head is seated as specified. Do not bury it deeply enough to break the face veneer or crush OSB strands, because that reduces support around the fastener.
Watch the edges particularly closely. A screw placed too near an edge can split plywood or break out OSB, while a screw driven at an angle can miss the framing below. If a fastener spins without tightening, stop rather than keep hammering it. Remove it, inspect for a stripped hole or missed framing, and follow the project’s repair instructions before installing a replacement.
Use the correct bit extension only when necessary; a long, flexible extension can wobble and make alignment harder. Keep spare batteries warm and charged in cold weather, and secure yourself and the tools against falls. Roof work adds fall hazards that no driver feature can mitigate: use appropriate fall protection and follow site safety requirements.
Make the purchase fit the work
For most homeowners fastening a limited amount of sheathing, a basic cordless impact driver with a variable-speed trigger is sufficient, especially if its batteries are already on hand. For repeated work, a brushless model with a low-speed setting is a worthwhile upgrade. Choose approved fasteners, a fresh matching bit, and a controlled driving technique before paying extra for headline torque. Those choices have more effect on a clean, reliable installation than the biggest number on a tool box.