What's inside
As an Amazon Associate I earn from qualifying purchases. This post may contain affiliate links at no extra cost to you.
What we cover
Choosing an Impact Driver for Hardwood Flooring
An impact driver can drive flooring screws quickly, but it is not automatically the best tool for every hardwood-flooring job. Its repeated rotational blows help with long screws and dense material; they can also snap a small screw, strip its head, or drive it too deep before you react. For finish work, control matters as much as power.
First check the flooring maker’s installation instructions. Many solid hardwood floors are blind-nailed or stapled, not screwed through the face. Screws may be appropriate for repairs, squeaks, subfloor fastening, or a particular engineered-flooring system, but the wrong fastener or installation method can damage the floor or affect a warranty.
As an Amazon Associate we earn from qualifying purchases at no extra cost to you.

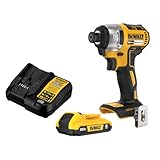


What to Look for
For occasional repairs or a modest room, a compact 18V or 20V-class cordless impact driver is usually sufficient. The voltage labels are not directly comparable across brands; look at tool size, speed settings, battery availability, and the control you can maintain. A brushless model may run longer per charge and need less motor maintenance, but a brushed model can be a sensible lower-cost choice for intermittent use.
Prefer a driver with at least two speed settings or a usable low-speed mode. A trigger that starts smoothly is especially helpful: full speed makes it easy to bury a screw head or damage the flooring. A 1/4-inch hex chuck is standard for impact-rated bits, but it is not a substitute for the correct screw-driving bit. Match the bit to the screw head and replace it when it starts to cam out.
Tool-only prices can look attractive, but batteries and a charger add to the actual cost. If you already own batteries in a brand’s cordless system, buying a compatible bare tool can be the better deal. If not, compare the complete kit rather than assuming a cheap tool listing includes what you need.
Impact Driver or Drill?
| Tool | Best use | Trade-off on flooring screws |
|---|---|---|
| Compact impact driver | Driving longer screws in dense wood or subfloor | Fast and capable, but can overdrive or break small screws |
| Cordless drill/driver | Short screws, pilot holes, and controlled finish work | Slower in hard material, but easier to stop precisely |
| Hammer drill | Masonry drilling with the hammer function switched on | Usually unnecessary for wood screws; hammer action is not a flooring feature |
A drill/driver with a clutch is often the safer choice for small screws or visible face-fastening. Its clutch can limit driving force, though the setting still needs testing on scrap. For a mix of pilot holes and screw driving, a two-tool kit with a drill/driver and impact driver is convenient; it is not essential if you are doing a small repair.
Practical Buying Choices
For a homeowner who needs one tool for varied repairs, a drill/driver may be the more useful purchase. Choose an 18V cordless drill/driver kit with a clutch if control and pilot drilling matter more than driving speed. A lower-cost brushed kit is fine for occasional work, provided it has a sound chuck, a controllable trigger, and batteries that are easy to replace.
If you already have compatible batteries and expect to drive many long screws, an impact driver with multiple speed settings is a reasonable upgrade. Compact tools are easier to manage in tight spaces, while larger models may offer more output at the cost of weight and bulk. Maximum torque figures are not a reliable way to judge how gently a tool will start a flooring screw.
How to Drive Screws Without Damaging the Floor
Use screws specified for the repair or flooring system, not general-purpose drywall screws. Drywall screws are brittle and can snap under load. Check screw length against the combined flooring and subfloor thickness, and make sure it will not reach pipes or wiring below. For a face screw, select a head style intended for the application; countersinking an unsuitable head can split or crush the wood.
Test the setup on an offcut or an inconspicuous area. Hardwood species vary: a screw that drives readily in one board may bind or split another. Drill a pilot hole where the screw maker or flooring instructions call for one, especially near board ends and edges. The pilot diameter depends on the screw’s root diameter and the wood; too small can split the board, while too large weakens the grip.
Set the driver to low speed, hold the bit square, and start with light trigger pressure. Stop when the head is seated at the intended depth. Do not keep pulsing the trigger after the screw is flush: impact blows can strip the recess or pull the head below the surface in a fraction of a second. If the bit slips, stop and inspect the screw head rather than forcing it. A fresh, correctly sized bit and firm axial pressure reduce cam-out.
Common failure signs include a spinning screw, a cracked board, a recessed head, and a screw that suddenly stops while the tool keeps hammering. Back out a damaged fastener if possible, then correct the cause—often a missing pilot hole, wrong bit, poor alignment, or an unsuitable screw. If the job involves a large area of new hardwood flooring, use the prescribed flooring fastener and installation tool rather than treating an impact driver as a substitute for the flooring method.