What's inside
As an Amazon Associate I earn from qualifying purchases. This post may contain affiliate links at no extra cost to you.
Removing a spot weld means cutting through the small weld nugget that joins two sheet-metal panels while keeping the lower panel as intact as possible. The right bit makes a cleaner hole and is less likely to wander, overheat, or break than a general-purpose twist bit. For occasional repair work, a standard cobalt drill bit can do the job; for repeated panel separation, a dedicated spot-weld cutter is usually easier to control.
As an Amazon Associate we earn from qualifying purchases at no extra cost to you.

What we cover
Choose the right bit for the weld
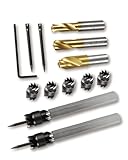
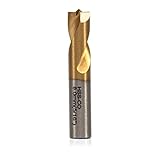
A spot-weld cutter is a short, often two-sided cutter with a small pilot pin. The cutter removes a shallow circle around the weld while the pin helps keep it centered. Because it cuts a ring rather than drilling a full hole, it can leave more of the underlying panel intact. Cutter diameters commonly fall around 3/8 to 1/2 inch; choose one that covers the weld without needlessly enlarging the opening.
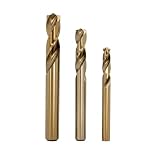
A cobalt twist bit is the low-cost alternative. A 1/8-inch bit can be used to make a pilot hole, followed by a larger bit sized to the weld nugget. It removes the entire center of the weld and is more likely to damage the panel underneath if you drill too deep. Cobalt bits tolerate heat better than ordinary high-speed-steel bits, but they still need sensible speed, firm pressure, and cutting oil.
For a repair involving many welds, consider a spot-weld cutter kit with replaceable pilot pins. For a few welds, a single cutter or a cobalt bit may be enough. Check the cutter’s stated diameter and shank size, and make sure the shank fits your drill chuck.
Spot-weld bit options compared
| Bit type | Best for | Advantages | Trade-offs |
|---|---|---|---|
| Spot-weld cutter with pilot | Repeated panel separation and cleaner holes | Centers on the weld; cuts a ring; often reversible | Costs more than a basic bit; pilot can snap if tilted or forced |
| Cobalt twist bit | Occasional jobs and tight budgets | Common, versatile, and useful for other metal drilling | Removes the weld center; depth control is less forgiving |
| Carbide-tipped spot-weld cutter | Hard welds or demanding shop use | Can cut efficiently when kept aligned | Usually pricier and brittle; side loading can chip the cutting edge |
What to buy
For a home garage job, a conventional cutter with a replaceable pilot is a practical starting point. Replacement pilots matter: a dull or bent pin makes the cutter harder to center and can turn a controlled cut into a wandering one. A single-sided spot-weld cutter with replacement pilots is a sensible choice when you want to replace the wear part instead of the whole tool.
If you expect to remove just a handful of welds, buying a large kit is unnecessary. A cobalt drill-bit set for metal gives you useful sizes for other jobs too. Use a sharp bit, start with a small pilot, and stop as soon as the weld releases. Ordinary black-oxide bits may manage a small number of welds in mild steel, but they dull faster and are a poor choice for repeated cutting or harder material.
Carbide-tipped cutters can be useful in tougher work, but they are not automatically the best buy. They cut hard material well when held square and steady; they can chip if the drill wobbles, the cutter catches, or the operator leans sideways. For typical automotive body panels, a good conventional cutter is often easier to live with.
Drill choice, speed, and pressure
Use a variable-speed cordless drill or corded drill in its low-speed range, with the clutch set so it will not interrupt the cut unnecessarily. An impact driver is a poor fit: its impacts make it harder to maintain a smooth, square cut and can damage a cutter or pilot. Do not use hammer mode. A drill press is useful for loose, flat parts, but it is rarely practical on an assembled vehicle panel.
There is no single safe speed for every cutter and sheet thickness. Follow the cutter maker’s guidance; as a cautious starting point, use about 500–1,000 rpm for a small cutter in thin automotive steel, slowing down if the bit chatters, heats quickly, or produces blue chips. Apply steady pressure rather than forcing the drill. A drop of cutting oil can reduce heat and wear, though some cutters are intended for dry use, so check their instructions.
How to remove a spot weld
First, confirm that the mark is a spot weld and identify which panel you need to preserve. Remove paint or seam sealer around the weld so you can see its center. Clamp or brace the panels where possible, mark the center with a punch, and keep the drill aligned perpendicular to the surface.
For a spot-weld cutter, let the pilot sit in the punched mark and cut gently around the weld. Pause to clear chips and check progress. Stop when the outer panel separates; drilling through both layers defeats the purpose. If the panels remain joined, a thin panel-separation chisel or scraper can help release the last bit of metal without using the drill as a pry bar.
With a twist bit, begin with a small pilot hole and step up carefully. Use a depth stop, tape marker, or a short bit to reduce the chance of punching through the lower panel. This method is less forgiving because the drill removes material through the weld itself, so inspect the back side whenever it is accessible.
Common failures and safety
A spinning cutter that will not bite is often dull, running too fast, or starting on paint instead of clean metal. A pilot that snaps commonly points to misalignment, excessive pressure, or a cutter that has caught in the panel. Stop if the bit walks, vibrates, or begins to overheat; forcing it usually makes the hole worse. Replace a damaged pilot or dull cutter rather than continuing with a tool that no longer tracks reliably.
Wear safety glasses, secure loose parts, and keep hands clear of the cutting path. Metal chips are sharp, and freshly cut edges can slice through gloves. If working on a vehicle, protect wiring, fuel lines, glass, and trim behind the panel, and disconnect the battery when the repair area or work method makes electrical damage a concern. After separation, deburr the edges and protect bare steel from corrosion.